| Private medium | Number of users | Requires equipment | Requires light control | Requires room control | Makes sound | Utilized in one sitting | Carrel beneficial | Requires room |
| Printed page | 1 | No | No | No | No | No | No | No |
| Microforms | 1 | Yes | No | No | No | No | Yes | No |
| Slides or flimstrips (silent) | 1 | Yes | No | No | No | Yes | Yes | No |
| Group | Yes | No | No | Yes | Yes | Yes | No | |
| Slides or filmstrips (sound) | 1 | Yes | No | No | No | Yes | Yes | No |
| Group | Yes | No | No | Yes | Yes | No | Yes | |
| Audio recording disk and tape | 1 | Yes | No | No | Yes | Yes | Yes | No |
| Group | Yes | No | Yes | Yes | Yes | No | Yes | |
| Motion picture film (sound) | 1 | Yes | No | No | Yes | Yes | Yes | No |
| Group | Yes | Yes | Yes | Yes | Yes | No | Yes | |
| Television | 1 | Yes | No | No | Yes | Yes | Yes | No |
| Group | Yes | No | Yes | Yes | Yes | No | Yes | |
| Flat visuals (e.g. maps, charts,  pictures, etc.) | 1 | Yes | No | No | No | Yes | No | No |
| Group | Yes | No | No | No | Yes | No | No | |
| Overhead transparencies | Group | Yes | No | No | No | Yes | No | Yes |
| Computers | 1 | Yes | No | No | Yes No |
Yes & No |
Yes | No |
| Group | Yes | No | No | Yes No | Yes & No |
No | No |
Tuesday, June 30, 2009
Media characteristics and environmental requirements
Monday, June 29, 2009
Non-print equipment & services: Telefacsimile
- Oldest office automation technology (1800’s)
- mid 1960’s Carterfone court decision, no longer illegal to connect equipment not owned by telephone company to phone system
- Fax appeared in 1842, four years after Morse Code
- Fax is used for document delivery/interlibrary loan, especially with acquisition requirements and periodicals. This speeds up the process in receiving articles. The machine has a built-in scanner to scan information. There should be library policies regarding who is able to use the machine, and whether there will be fees. Faxing takes longer, which added to its unpopularity.
- 1980: Group 3 fax standard set by Consultative Committee for International Telephone and Telegraphy (CCITT ) now International Telecommunications Union-Telecommunications Standard Sector (ITU-T), an advisory organization that is part of the United Nations
- Group 3 is the current standard, all fax machines currently on the market are Group 3 compatible
- Group 1 and 2 are both now obsolete; it would take 6 and 3 minutes respectively to fax a page, whereas the Group 3 standard is 1 minute
- 1984 Group 4 fax standard set
- Applies only to fax machines that operate over digital phone lines
- For co-operations, some interface with computer or phone. Depending on the speed of the machine, a page takes 30-40 seconds to transmit.
- A document suitable for faxing may be either paper or electronic
- If paper, a scanner needed to convert document to digital form. The scanner is built into the fax for the electronic signal to be sent over the lines. If the electronic form is on a computer, a fax can be sent via that. It should be noted that the use of a fax machine has not been replaced.
Basic fax features
When purchasing a fax machine, some features to consider are:
- automatic step-down
If a fax is stopped, the machine slows down and connects again. - automatic send and receive
This allows the machine to operate without supervision. - delayed dialing
Automatic redialing can be programmed for later in the day, or programmed to send a fax at a later time. - one-touch dialing
- coded dialing
These two features are similar to speed dialing. - automatic re-dial
Use this feature if unable to send a fax. - document feeder
Allows document to feed through sequentially - management reports
Reports details of faxes sent and received. - memory
Stores images to send or receive at a later time. - broadcasting
Saves time by sending faxes to more than one number at a time.
Types of fax machines
- Thermal paper (disappearing from market)
This was the earliest machine back in the 1980s. They were virtually indestructible with paper coated with heat reacting chemicals. There was no need for ink. The image, however, would disappear over time, or with heat exposure. The machine would be accompanied by a telephone receiver. - Thermal film
Uses page width film ribbon, thermal in roll. - Inkjet
Similar to an inkjet printer. - Laser
Common in combination, has most archival potential
Variety of configurations
o Stand alone
o Combination
Fax/photocopiers/scanners
Photocopiers
- Dry process photocopying invented 1938 (xerography)
- 1st Xerox copier 1959
- Xerox patents in force until mid-1970s
- 1960s liquid toner copiers inferior to Xerox but cheaper. Competition was available after mid-1970s.
Most combination photocopiers are now in use. Anything a photocopier can do, the internet and/or printer can do just as well. Photocopiers are still largely used in libraries, all using the dry process.
Selected features
It should be noted that photocopiers are not usually sold for public use.
- automatic document feeder
- recirculating document feeder
creates double sided documents - bypassfeeds in a single page
- duplex
automatically copies and prints double-sided - enlargement/reduction
- exposure control
accounts for colour pages, photo light, differences - sorter
Trays sorting individual copies. - finisher
Staples and/or hole punches documents
Be aware of a photocopier’s durability. Predict how much use it will receive. Have a basic machine for public use - this will see less problems. Have visual instructions to make it fool and idiot proof. Some libraries have machines with coin boxes for use – but this costs extra.
Classes of copiers
- Personal copiers (Occasional use)
o up to 750 copies per month
o 8-10 copies per minute - Low volume
o 2,000-20,000 copies per month
o less than 20 copies per minute - Medium volume
o 20,000-50,000 copies per month
o 20-50 copies per minute - High volume
o 50,000-150,000+per month
o 50-120 copies per minute
As a rule, the larger the institute, the higher the volume copier purchased.
Choice factors
- Machine reliability
- Dependability of vendor service
- Volume of copying
- Special features required
- Special features useful enough to be worth the cost
- Durability
- Buttons
- What will the copier be primarily used for?
- Will the features be worth the money?
Rent, lease, purchase, copy service
Rent
o no long term investment or financial commitment
o full service responsibility on vendor
o machine may not be new
o PCs and low volume not usually available
o medium volume annual or 2 year contracts with early termination policy
Lease
o like renting but locks in for longer term
o imposes penalties for early termination
o costs less than renting
Do you rent (1-2 years), lease (2+ years) or purchase a photocopier? They don’t last forever. Service can be included in rent or lease charges.
Purchase
o usually only for medium and high volume
o consider only if very reliable maintenance and service and can pay it off in no more than 4 years
Copier service
o copier provided at no cost in return for proceeds or a percentage of proceeds
Institutions generally purchase machines as they receive the money made from its use.
Friday, June 26, 2009
Non-print equipment & resources: Equipment resources
Cabecceiras, James. The multimedia library: materials selection and use. 3rd ed. San Diego: Academic Press, 1991.
infoCom: International Communications Industrial Association Inc. AV products.
http://catalogs.infocommiq.com/AVCat/CTL1642/index.cfm
Media & Methods Magazine Online: 2003 Buyers’ Guide & Reference Dictionary
http://www.media-methods.com/bg/index.php
Post, Richard. “Life-span Obsolescence, and Depreciation in the Management of Educational Technology.”
http://www.springerlink.com/content/m0t1x54008n1k501/
Article reprinted from Tech Trends, Sept. 1999 (Vol. 43, No. 4) Contains table of predicted obsolescence of a variety of equipment based on survey of 12 Ohio universities.
School Executive Magazine Online: 2000 Buyers’ Guide http://web.archive.org/web/20030803205308/http://www.schoolexec.com/bg1.html
Also search EBSCOHost for relevant articles.
Dealer Web Sites
Inland AV
http://www.inland-av.com/
Canadian dealer.
Winnipeg Audio-Visual
Local dealer
Listservs
Edtech
http://www.h-net.org/~edweb/
Topics include – notable educational hardware and software, as well as junk one should avoid.
LM Net
http://askeric.org/lm_net/
Dedicated to school library media specialists worldwide, and to people involved with the school library media field. Archives searchable at http://www.eduref.org/
Media-L
http://listserv.binghamton.edu/scripts/wa.exe?A0=MEDIA-L
Focuses on media literacy. Serves as a network for people in the media services profession to ask questions and discuss new procedures or services.
Wednesday, June 24, 2009
Calculating reader/printer costs
For many years, working with information from Buyers Laboratory, Inc., LTR has suggested that the way to determine the real cost-per-copy for prints from a photocopier is to divide the cost of the machine including service contracts and other easily identified direct costs by this number of copies produced by that machine during a five year period. (Five years is an arbitrary period chosen to fully depreciate the machine.) The dividend of this calculation is then added to the cost-per-copy for ma trials only to arrive at a figure that recognizes that you can’t make copies unless you have the machine. Cost-per-copy calculations of this type are done for a range of photocopiers with the results used to select the most appropriate machine for the job to be done. It is not unusual for a machine with a high initial price to be the least expensive on a cost-per-copy basis for a very high volume user and vice versa. Similar calculations can be done with microform reader/printers to determine the real cost for r/p copies and to help in determining the most appropriate machine.
How much should a library charge for r/p copies?
The calculations outlined above could also be used to determine the price to be charged for making r/p prints. A few libraries already use this strategy for pricing photocopies and r/p copies. After determining the real cost-per-copy, these libraries set the price accordingly and retain a portion of the receipts in a sinking fund that can be used to purchase a new machine when the present machine wears out. Libraries that are able to arrange their finances in this way are not faced with large budget requests when a new machine is needed. The users also benefit by having good equipment available.
Several months ago, the editor was in contact with a college librarian who is in charge of an extraordinarily active library microform facility that provides r/p copies for less than a nickel a print. The library’s reader/printers are so heavily used that they must be replaced periodically. The charge covers the cost of supplies and little else so when the machines wear out, the replacement must be a capital expense in that year’s budget. With this volume of copying, if this library were to raise its rates only modesty it could generate enough revenue to replace the machines as they wear out. Most libraries will probably have the opposite problem-low copy volume-so that the price charged per copy will never fully pay for the machine. These calculations might be useful when trying to justify for a price increase or when trying to explain why r/p copies are more expensive than ordinary photocopiers.
Library Technology Reports
July-August, 1991, p. 413.
Tuesday, June 23, 2009
Non-print equipment & services: Microforms
Required Reading:
Choosing microform readers and reader/printers
South Carolina Department of Archives and History Archives and Records Management division
http://www.state.sc.us/scdah/NINE.PDF
Pros
Conserve space
Wide range of materials
Improved services
Easily converted to print with reader-printer
Less mutilation
Easily replaced
Cons
Specialized equipment/environment required
Equipment maintenance
Variety of standards
Lack of colour
Lack of bibliographic control
User resistance
Microform
An optical information storage medium that contains photographically reduced images.
Microfilm
16mm width of choice for business-oriented applications, technical and industrial libraries
35mm most common size in libraries
Microfiche
A card-shaped sheet of photographic film, usually 3 x 5 or 4 x 6 inches in size, designed to store miniaturized text and/or microimages arranged in a two-dimensional grid pattern. Various formats exist, but ISO recommends 75 x 125 mm (48 frames in four rows of twelve) or 105 x 148 mm (60 frames in five rows of twelve). Although each sheet usually includes a title, index number, or other heading across the top which can be read without magnification, the text itself can be read and copied only with the aid of a microform reader-printer machine. ODLIS http://lu.com/odlis/index.cfm
Micro-opaque
A sheet of opaque material, such as paper or card stock, bearing miniaturized text and/or microimages in a two-dimensional grid pattern, which can be magnified and copied only with the aid of special equipment. Microform reader-printer machines are usually available in libraries with microopaque holdings for viewing and making hard copies. ODLIS http://lu.com/odlis/index.cfm
Silver gelatin
Most popular camera film for source department microphotography
Also known as “silver halide microfilm”
Archival
Inappropriate storage can result in redox blemishes
Diazo
Intended for exclusively for duplication and is most widely used type of film for duplication
Depending on dye used will appear black, blue or sepia
Some types long-term (100 year) potential; some types medium-term (10 year) potential
Will eventually fade, even if stored in the dark. Prolonged exposure to light accelerates fading.
Vesicular
Uses a process involving exposure to ultraviolet light and development by heat
Limited to duplication function
Normally results in reverse polarity of microform being duplicated and most widely used in COM applications where the master is positive and negative working copies are desired
Readily identified by their beige, gray or light blue colour
Some long-term; some medium-term potential
May produce hydrochloric acid
ANSI levels of stability
| Archival | Indefinite |
| Long-term | 100 years |
| Medium term | 10 years |
Monday, June 22, 2009
Non-print equipment & services: Tripod movements
 Dolly: to move the camera and tripod (on wheels) toward or away from the subject.
“Dolly in” or “Dolly out”

Truck: to move the camera laterally (on wheels) to the left or right
“Truck left” or “Truck right”
“Truck left” or “Truck right”
 Pan: a horizontal movement of the camera only (While the tripod remains stationary)
“Pan left” or “Pan right”

Tilt: an up and down movement of the camera only (while the tripod remains stationary)
Both panning and tilting adds variety to the image.

Zoom: a movement of the camera le ns to make the image larger and closer or the image smaller and further away
“Zoom in” or “Zoom out”
Tips:
- When doing any of these movements, be sure to move slow and steady.
- Plan the movement ahead of time.
- Do another take without a movement, just in case.
Composition tips 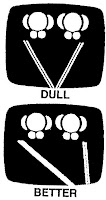
To avoid boring straight-on shots, shoot from a side angle.

To avoid boring straight-on shots, shoot from a side angle.
 To avoid cutting off the top of subject’s head, give some “head room”.

To avoid an unbalanced shot, center subject closer to the middle of the frame.
To avoid your subject running into a “wall”, give some “lead room”.

Terms
Head room: the amount of space on top of subject
Lead room: the amount of space in front of subject
Wednesday, June 17, 2009
Non-print equipment & services: Video camcorder & digital camera comptency
Video camcorder competency
As a library technician you may be called upon to videotape events such as school pageants, awards ceremonies, author readings (with the author’s permission), etc. At the very least you will be expected to be able to show users basic video camera operating techniques.
Digital camera competency
The Sony Mavica MVC-FD73 stores images on high density floppy discs. Storage devices used by other digital cameras include Compact Flash, Secure Digital and Multimedia Cards, Memory Stick, Microdrive, etc. Digital images can be imported to web pages, PowerPoint presentations, word processing documents, etc.
If you require information on transferring files see:
http://web.archive.org/web/20031209014843/http://www.tech4learning.com/snacks/pdfs/transferringimages.pdf
Additional information on digital photography is available on the following sites.
Curtlin, Dennis P. Short courses in digital photography.
http://www.shortcourses.com/index.html
A quick course on many aspects of digital photography.
Kodak Digital Learning Center
http://webs.kodak.com/US/en/digital/dlc/
A collection of online “textbooks” that offer step-by-step tutorials on digital imaging.
Nice, Karin and Gerald Jay Gurevich. How digital cameras work.
http://www.howstuffworks.com/digital-camera.htm
PCPhotoREVIEW.com
http://www.pcphotoreview.com/defaultcrx.aspx
Product reviews written by professionals and consumers. There are also free mini courses on digital photography, ongoing chat rooms, and other features.
Tuesday, June 16, 2009
The latest in projection screens
How often do you project visuals on a screen and the images are so pale, they can hardly be seen? Did you know that different projection screens give you different images? There is more to these devices than meets the eye.
Classroom applications
Front projection screens are the most common type of screen found in education. These screens are ideal for projecting LCD projector images. Teachers simply shine the LCD projector image onto the specialty designed screen and the image is clearly visible to large classes. Front projection screens include the following types:
- Wall-mounted
- Ceiling mounted
- Recessed (hidden above the ceiling, with a slot or trap door through which the screen descends)
- Fixed (mounted to the wall in frame)
- Motorized or manually-operated (pull down or using a crank)
The biggest benefit of using a projection screen is size. With the proper screen and projector combination, an image can be six feet wide, eight feet wide, or more. The screens also make projected images brighter than a wall or standard pull-down materials since they have white or glass bead surfaces to better illuminate surfaces.
At the New Castle Middle School in New Castle, IN, projection screens are used in many ways. Teachers use the screens to introduce their web pages at the beginning of the school year. By pointing to various features on the projected image, students learn how to use homework helpers, get their grades or e-mail questions to the teacher.
Since individual computers may not necessarily be in use during a class period, websites can be reviewed and discussed with a whole class by projecting sites onto a screen from an LCD projector. The screens are also used for staff training and meetings.
Selecting the right screen
There are many types of screen surfaces and sizes, so choosing the right surface depends on several variables. Sizes and materials depend on room size, how much ambient light there is in the classroom, what kind of projector is being used (and if the projector is ceiling mounted or on a cart on the floor) and what kind of images are going to be projected.
In a classroom, fiberglass matt surface white wall or ceiling mounted screens are usually best. When overhead projections is being used, the glass beaded surface is not recommended. The reflective material, plus the bright white background, will cause a bright hot spot in the center of the screen. Matt white also has the major benefit of being washable.
Choose a screen that best handles your room’s needs such as size, operation (i.e. fixed frame, manual roll-up or electric roll-up) and mounting (i.e. ceiling mounted, wall mounted, or floor mounted). Determine if the seating area will require the viewers to watch the projected image from a narrow versus a wider angle of more than 30 degrees from either side of the center of the screen. A screen with a wider viewing angle – with a more uniform presentation across the screen – means more people can see clearly.
Whether you are using a state-of-the-art multimedia projector or a ten-year-old overhead projector, the right screen definitely affects any school presentation and bring it to glorious life.
Projection screen distributors
Audio Video Associates
888/435-1519 www.avaonline.com
Circle Number 320
Da-Lite Screen Co., Inc.
800/622-3737
www.da-lite.com
Circle Number 321
Draper Inc.
800/238-7999
www.DraperInc.com
Circle Number 322
PolyVision Corporation
800/679-6226
www.thescreenworks.com
Circle number 324
Vultec Corp.
800/770-4700
www.vutec.com
Circle number 325
By Greg Allen
Greg Allen is a social studies teacher at New Castle Middle School, New Castle District in New Castle, Inc.
Friday, June 12, 2009
Non-print equipment & services: Video supplementary resources
Dictionary@AudioVideo101
http://www.audiovideo101.com/dictionary/default.asp
Brain Marshall. How television works.
http://entertainment.howstuffworks.com/tv.htm
Brain Marshall. How VCRs work.
http://entertainment.howstuffworks.com/vcr.htm
Harris, Tom. How Camcorders work.
http://electronics.howstuffworks.com/camcorder.htm
Nice, Karin. How DVDs work.
http://entertainment.howstuffworks.com/dvd.htm
TV/VCR Connections
http://teachnet.edb.utexas.edu/~medialab/tutorials/tvcr.htm
Van Horn, Royal. “A Primer on the new television”. Phi Delta Kappan; Sep. 2002, Vol. 85 #1 p.7-8. Available fulltext from EBSCOHost MasterFile Elite.
Wednesday, June 10, 2009
Non-print equipment & services: Video projection systems
Videotape
A VCR has two or more heads. A two-head VCR reads a mono soundtrack. The more heads, the better the picture and sound quality. The same video heads are responsible for recording and replaying, and in some models they are responsible for the stereo audio pickup.
Another standard of connector is S-video. Some video recorders, camcorders and laser disc players are compatible with this standard. When connected to a television which has an S-video input, these products may allow better picture quality than can be achieved through normal video connectors.
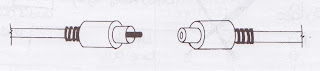
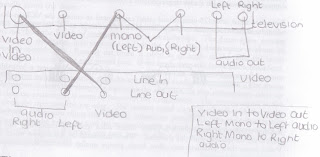
 A popular way of connecting modern VCRs and TV sets is a standard aerial cable and direct video input using cables with RCA plugs. This enables either a mono signal (2 cables – 1 for video, 1 for mono sound) or a stereo signal (3 cables – 1 for video, 1 for left audio, 1 for right audio). The RCA plugs are coloured the same at each end of each cable, enabling easy connection between ‘Video out’ (on the VCR) and ‘Video in’ (on the TV), ‘Audio R(ight) out’ (on the VCR) and ‘Audio R(ight) in’ (on a stereo TV) and so on.
 Activity
Activity
Videotape is very much like audiotape. It is made of (0.02 mm thick) polyester plastic and works in basically the same way. Sound is encoded on a portion of tape and the picture is encoded as magnetic particles representing dots of various brightness ‘seen’ when the original picture was scanned for recording.
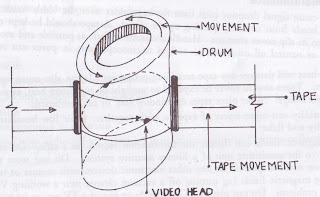
The information is recorded magnetically on tracks, diagonally across the tape. This method allows as large a surface area as possible to be involved in holding the recorded signals.
There have been three formats of videocassettes available in schools and libraries, none of which is compatible with the other. Each type of cassette requires a different type of videocassette recorder (VCR) to utilize it.
VHS
- 1/2 inch wide
- now the standard videotape for non-broadcast use
- 3/4 Inch wide
- was widely used in educational institutions
- expensive to buy equipment and software
- better quality
- equipment expensive to maintain
- rarely found now, although some tertiary institutions still have U-matic collections
- 1/2 inch wide
- rarely found now
- blank or prerecorded tapes are unavailable
Videocassettes have tabs to prevent accidental erasure. A videocassette has only one tab because – unlike audiocassettes – information can be recorded on one side only.
Activity
Examine a videocassette and note the erasure tab. Open the top protective cover by depressing the pin at the top of the right hand side of the cassette and lift back the cover. Look at the videotape but do not touch it.
Recording systems
When a TV set receives its signal (either through the aerial or from a VCR), electronic circuitry translates it into sound and pictures. There are different systems or formats for transmitting TV signals. Different countries have different systems, the most common being:
Always check the videocassette to determine the type of recording system, although a videocassette brought overseas may not be labeled accordingly. You can get some VCRs to recognize a particular recording system. An organization that buys videotapes from overseas should be aware of the system used, as it must be compatible with the equipment that the library owns. Some modern VCRs have the capacity to play PAL, NTSC and SECAM tapes. Older TVs may not give the same quality picture when viewing a non-PAL tape. If a VCR is not multi-system:
- NTSC programs cannot be played on PAL and SECAM equipment, and vice versa.
- PAL and SECAM can be interchanged but with loss of colour.
Care and maintenance
- Dust can cause signal dropout each time the tape rides over the video head. The dust stops the heads from correctly picking up the signal. A tape should be kept covered and returned to its slip cover after use. Handle a cassette as little as possible and avoid touching the tape, as natural oils on hands as well as microscopic dirt in pores can ruin precious pictures.
- Excessive heat will damage any tape properties. It can also cause tape to lose its magnetism. Tapes should never be exposed to sunlight or any direct heat, as videotapes are prone to shrinkage. Never place tapes on window sills or car dashboards.
- High humidity can cause layers of tape to stick together, while low humidity can cause tapes to dry and flake.
- Strong magnetic fields can distort the information stored on a tape. Do not expose a videotape to the sensitizing unit of a library security system. Do not store tapes near a television set or hi-fi speakers or any other electronic devices with motors or transformers. Collapsing magnetic fields (e.g. turning off a vacuum cleaner near a working VCR or TV) can cause problems. There should be at least 30 cm between these two pieces of equipment, or at least a thick shelf.
- Tapes expand and contract when in motion. If they expand or contract too much it can affect the speed and quality of the picture. To make sure tension is even, always rewind the tape. If the cassette is stored partially wound, the tape between the two reels is not under the same tension and could cause distortion. Brand new tape is wound by a machine and the tension of the new tape and that of the video player may be different. Run a new tape through and back to adjust the tension to the VCR before recording.
- Tapes stored for long periods of time get ‘print through’ of magnetic signals. ‘Print through’ results in a ghosted signal (like a double exposure on photographic film). Tapes should be fast-forwarded and rewound once a year to prevent images being transfer red through the tightly wound tape.
Videocassette recorder (VCR)
How it works
Spiral (helical) scanning is used to read the information recorded on the videotape. The recording and playback heads are mounted on a rotating drum that is tilted so that the tape is fed diagonally across the drum.
The image information (video signal) is recorded in diagonal tracks across the face of the videotape, not along the length of the tape as it is on an audiotape. The drum spins, moving the heads to read the image information stored on the tape. The drum spins at about 30 revolutions per second (rps). Because the drum is tilted at an angle to the tape, the heads follow the diagonal tracks as the tape moves past. If the heads were still (as in audio recorders), you would need a tape 80km long to store a two hour movie, as the video signal contains perhaps 500 times more information than the sound signal (audio information). The mono audio information is recorded along the tape near the top edge, as this information takes up less space than the picture and it keeps in time with the image track. The control signal is also recorded along the tape near the top edge. The control signal aligns the heads with the tracks during playback. When you adjust the ‘tracking’ control on your VCR, you are adjusting the tape position so that the heads can read the tracks properly. Usually this is not necessary but if the tape is well-used, worn or stretched you may have to adjust the tracking. Some VCRs have automatic tracking adjustment.

A VCR has two or more heads. A two-head VCR reads a mono soundtrack. The more heads, the better the picture and sound quality. The same video heads are responsible for recording and replaying, and in some models they are responsible for the stereo audio pickup.
The heads are very small and delicate, and easily damaged through mishandling or contact with a rough surface.
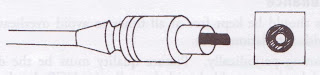
Connectors
A VCR may be connected to a television set by a number of cables and connectors. Most domestic TV sets receive the picture via an aerial plugged into an aerial socket. This signal is commonly known as RF (radio frequency).
A standard aerial cable (75 ohm coaxial cable) can be used to connect the VCR to the TV set using the 'RF out' terminal on the VCR and the 'Antenna in' or 'RF in' terminal on the TV set.
 A popular way of connecting modern VCRs and TV sets is a standard aerial cable and direct video input using cables with RCA plugs. This enables either a mono signal (2 cables – 1 for video, 1 for mono sound) or a stereo signal (3 cables – 1 for video, 1 for left audio, 1 for right audio). The RCA plugs are coloured the same at each end of each cable, enabling easy connection between ‘Video out’ (on the VCR) and ‘Video in’ (on the TV), ‘Audio R(ight) out’ (on the VCR) and ‘Audio R(ight) in’ (on a stereo TV) and so on.Activity
Examine a VCR/TV combination and determine which type of system is used to connect the equipment. Draw a diagram of how the VCR and TV are connected.
Activity
Examine a VCR and identify the following controls. Your VCR may not have all these controls. Some may be found on the remote control.
- on/off switch
- play button
- stop button
- fast forward/cue button
- rewind button
- recording button
- pause button
- eject button
- program button (to select programming option)
- channel selector
- tracking button
Care and maintenance
- Ventilation grills should be kept free at all times to avoid overheating. VCRs should be stored in units with ventilation holes.
- Heads need cleaning periodically. Picture quality must be the deciding factor. If the picture is ‘noisy’ (grainy, speckled with ‘snow’), the VCR heads need cleaning. White spots across a picture (‘drop out’) indicate that particles of iron oxide have dislodged with use, particularly with a poor quality tape. Heads are extremely delicate, and need to be treated with care.
- Heads may be cleaned manually using a chamois leather swab and isopropyl alcohol wiped gently backwards and forwards along the head (around the drum) rather than across it (up and down the drum). If using a head-cleaning tape, use one that uses a solvent.
- Use good quality tapes. Poor quality tape will leave residue on the heads.
Troubleshooting
Exercise
Complete the following troubleshooting table, suggesting possible solutions to operating problems. You may find it useful to refer to a user manual.
| Problem | Possible solution | |
| Snowy picture appears on TV during playback | Adjust tracking Clean heads Warm video | |
| VCR does not record or cassette is automatically ejected when recording function is selected | Cover erasure tab with tape | |
| No power, VCR does not operate | Connect power lead properly Turn on power Disengage timer |
Tuesday, June 9, 2009
Non-print equipment & services: Projection screens
The right screen surface depends on the type of projection you’re using, the size of your seating area, and the lightning in your viewing area.
Front projection
Rear projection
Translucent Lets light shine through but scatters and softens
Mainly used for rear projection
A screen mounted on a 3-legged stand is called a tripod screen.
Setting up a tripod screen
1. Hold screen in a vertical position and use your foot to release the leg lock.
2. Spread legs so they extend out to their maximum distance to ensure stable support of the screen.
3. Release the upper extension rod that is inserted into the end of the metal case.
4. Rotate the metal case from vertical to horizontal position.
5. Rotate the keystone correction bar (if present) into place if you intend to use it.
6. Grasp the handle on the edge of the screen and pull the screen up and hook the handle into the extension rod or keystone correction bar.
7. Raise the extension rod to the desired height. This pulls the screen out of the metal case.
8. To collapse, reverse the procedure.
For further information about screens check:
Allen, Greg. “The Latest in projection screens.” Media & Methods; May/Jun. 2001, vol. 37 #6, p.34Available on EBSCOHost Academic Search Premier
United Visual. “How to choose a projection screen.”
http://www.lcdprojector.net/2tips/2tscr101.asp
Da-Lite. “Selecting the right screen”.
http://www.da-lite.com/products/selecting.php
Da-Lite. “Guide to selecting front projection screens”.
http://www.da-lite.com/education/guide.php
Front projection
| White matte | Smooth non-shiny surface Most suitable for wide shallow or square rooms Most popular type of front projection screen |
| Glass beaded | Coated with tiny glass beads Reflects narrow pattern of light further back into the room Most suitable for long, narrow rooms |
| Lenticular | Silver corrugated material that reflects a pattern of light as wide as the matte screen and as far back as the glass beaded screen A compromise between the beaded and matte white surface |
Rear projection
| Translucent | Lets light shine through but scatters and softens Mainly used for rear projection |
Mainly used for rear projection
A screen mounted on a 3-legged stand is called a tripod screen.
Setting up a tripod screen
1. Hold screen in a vertical position and use your foot to release the leg lock.
2. Spread legs so they extend out to their maximum distance to ensure stable support of the screen.
3. Release the upper extension rod that is inserted into the end of the metal case.
4. Rotate the metal case from vertical to horizontal position.
5. Rotate the keystone correction bar (if present) into place if you intend to use it.
6. Grasp the handle on the edge of the screen and pull the screen up and hook the handle into the extension rod or keystone correction bar.
7. Raise the extension rod to the desired height. This pulls the screen out of the metal case.
8. To collapse, reverse the procedure.
For further information about screens check:
Allen, Greg. “The Latest in projection screens.” Media & Methods; May/Jun. 2001, vol. 37 #6, p.34Available on EBSCOHost Academic Search Premier
United Visual. “How to choose a projection screen.”
http://www.lcdprojector.net/2tips/2tscr101.asp
Da-Lite. “Selecting the right screen”.
http://www.da-lite.com/products/selecting.php
Da-Lite. “Guide to selecting front projection screens”.
http://www.da-lite.com/education/guide.php
Monday, June 8, 2009
Non-print equipment & services: Document cameras
Document cameras also have the aliases of doc cam, visual presenter, video presenter video imager, imaging camera, visualizer.
A document camera is used to present hard copy documents, graphics, and small objects to a large audience. Most campus electronic classreooms are equipped with document cameras. A television or video projector is required to view the images from a document camera.
Canon RE-450X document camera
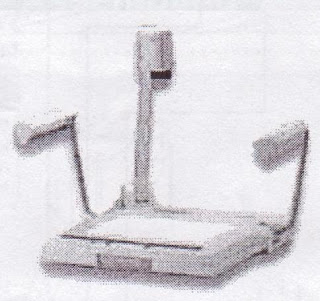
A high-resolution document camera designed to show documents, transparencies, or physical objects to an audience through either a projector or TV. This model has a resolution of 1024x768, which matches the resolution of most video projectors. It captures images at 15 frames per second.
Troubleshooting
- No image on display
First verify that the document camera has power by looking for the power indicator light on the left side of the controls. The power switch is located on the left side of the unit, and should be left in the “on” position. Next, make sure the “Input select” light is turned off on the front panel of the document camera. Also check that the “Still picture” light is turned off as well. - Image not positioned correctly
Zoom in and out on the image using the “Wide” and “Tele” buttons under the Zoom section of the control panel. Then position your document. - Image is out of focus
Press the “Auto” button under the Focus section of the control panel. If fine tuning is necessary, use the “Near” and “Far” buttons. - Image is too bright or too dark
Use the controls under the White Balance and Exposure sections of the control panel to adjust the image. In most cases, White Balance can be set to “Auto” and then exposure adjusted to the desired level.
The instruction manual for the Canon RE-550X is available online at http://www.phys.vt.edu/~demo/references/equipment_manuals/re450x_manual.pdf We were provided copies of pages 7-9, 11 and 15 (Operational panel, Assembling, storing and connection, Operation, and System connection).
Friday, June 5, 2009
Non-print equipment & services: Filmstrip projection
Filmstrip projection
- a series of still pictures on a 35 mm of film
- often accompanied by a sound cassette programmed to automatically change filmstrip using a 50 Hz. signal to activate advance
- almost all programs come with a dual recording; automatic (inaudible 50 Hz. pulse) on one side, manual (audible pulse) on the other.
Formats
- single frame; most common, held vertically for projection, ½ of full frame
- double frame; produced on regular 35 mm camera using full frame and held horizontally for projection
Handling filmstrips
- handle filmstrip by edges to avoid fingerprints
- filmstrip is inserted upside down and backwards (when you are behind the projector, facing the screen)
Storage
- best stored in original container
- cabinets available
- some projectors use a cartridge
Advantages
- easily and compactly stored
- always in proper sequence
- can project silent strips at own rate
- must always be shown in the same sequence
- easily damaged in handling
- most designed for single-frame filmstrip; but some can handle both and others adapt for slides
- sound filmstrip projectors use a cassette tape as sound source. Inaudible pulse is used to synchronize.
- a 50 Hz. pulse is usually used, but some have 1000 Hz. pulse
- viewer/projector models available
Operating procedure
1. remove front screen units from case and plug in
2. insert filmstrip upside down as you ace the lens (strip should curl toward screen)
3. hold film along edges and push into slot until it can go no further
4. turn ADVANCE knob until film comes out exit slot
5. turn on projector and turn on lamp (the Dukane has two separate switches, both must be on for advance reverse to work)
6. advance to focus/start frame and focus (frame if necessary)
7. raise or lower base as necessary
8. for sound projection advance filmstrip to frame saying “start the tape here”
9. insert tape, rewind to beginning and push play
10. at end, turn lamp to frame
11. remove filmstrip, rewind by hand
12. when cool turn off, unplug, return to case
Cleaning
Dust off condenser lens with camel’s hair brush. Clean front and back of projection lens with lens tissue. Glass pressure plates need to be cleaned or dirt may scratch the filmstrip.
Troubleshooting
| Problem | Cause | Solution |
| Black screen | Lamp burned out. Cord not plugged in. | Replace lamp. |
| First image two half-frames | Filmstrip not framed | Turn framer knob. |
| Filmstrip not feeding properly | Filmstrip not correctly threaded | Remove and rethread. |
| Filmstrip not engaged | Filmstrip not pushed in far enough | Push into slot until filmstrip can go no further. |
| Spots on screen | Dirty projection lens. Dirty condenser lens. | Remove lens and clean. Clean with camel’s hair brush. |
| Permanent line on screen | Condenser lens cracked | Replace lens/take in for repair |
| Fuzz or hairs at edge of image | Dirt in aperture and film gate | Open gate, clean |
Framing is important. Images must be framed to be viewed clearly.
Motion picture film
Definition
A series of still photographs or drawings on film projected by means of light to give allusion of continued movement.
- Film widths – 8mm, 15mm, 35 mm, 70 mm
- Film parts – sprocket holes, picture frame, soundtrack
- Film speed
o sound, 24 frames per second, 36 ft. per minute
o silent, 16 frames per second, 24 ft. per minute
History
- First successful photography of motion by Edward Muybridge, 1878 pictures of running horses
- First public showings in Paris, 1895.
- First major movie ‘Great Train Robbery’, 1903
- First major talkie, using phonograph timed to film, ‘The Jazz Singer’, 1927
- ‘Sound era’ dated 1929 when thousands of cinemas were equipped for sound
- Cinema Scope a wide-screen process first used in the 1953 film ‘The Robe’. Uses an ANAMORPHIC lens which squeezes a wide picture onto a standard 35 mm frame
- 3D films became popular in Hollywood in 1953. This system required Polaroid glasses. Dial M for Murder, Kiss Me Kate and House of Wax considered to be the best films produced using 3D.
- IMAX a large screen format developed in Canada and introduced in 1970 at the World’s Fair in Osaka, Japan. First commercial IMAX theatre opened 1987 in Winnipeg.
The motion picture film projector
16mm projectors
Types
- manual load
- automatic load
- slot load
The slot load is the easiest to load, and also rewinds easy.
- Film comes off a feed reel in a clockwise direction and goes onto a take-up reel.
- The film coming off the feed reel has an image that is upside down and backwards.
Prepare your room
Locate power source. Carefully position screen, projector and speaker. The speaker should be located close to the screen, 4’ – 5’ from the floor and directed towards the audience. Cords should be kept away from the aisles and secured at each end. Blackout must not impede ventilation. Test film and equipment prior to presentation.
Film check
- Title on leader should be same as that on the can
- Holding reel upright with film leading away from the top to the right, sprocket holes should be on nearest edge of film to you – otherwise rewind
- Look for any indication of film breakage
- In winter, if film has been subjected to the cold, expose at room temperature for at least 15 minutes prior to showing.
Equipment check
- Assemble, see all switches are down and plug in speaker and power cords
- Clean lenses with lens tissues and gate with brush
- Switch on light. Check lamp, raise and centre light beam on screen, focus edges. Switch off light. Wait for lamp to cool before switching off motor.
- Clean apertures again in back and pressure plates if necessary.
- Switch on amplifier and wait for a few seconds for exciter lamp to light up. Turn up volume to check connection from projector to speaker. Turn back volume control.
Thread film and check manually.
Presentation
Run the show correctly. Arrange to have someone switch off room lights at your signal. Switch on amplifier. Watch for figures 11, 10, 9 … 3 to pass aperture, switch on light, focus and turn up volume simultaneously. Adjust tone and volume as necessary.
At end of film partner should be ready to switch on room lights. Turn projector light off and sound volume right down. Wait until film has run through machine. Remove full take-up reel but leave motor running until lamp is cool. Exchange reels on feed (forward) and take-up arms and rewind.
Care of films and equipment
The projectionist has a great deal to do with prolonging the life of the film. Most damage that occurs to film is due to careless handling and improper threading.
Film damage can be avoided if the following practices are followed:
- Keep the projector clean in good repair.
- Thread the film through the projector carefully.
- Occasionally check film for damage as it goes on take-up reel.
- Avoid the use of bent reels.
- Inspect the film while rewinding.
- Store film in cool place when not in use. Note: Extreme heat and cold are injurious to film. Expose very cold films to room temperature for a time before showing. Do not place near a hot radiator or stove or carry films in the trunk of a car.
- Keep film off the floor.
- Never cinch film on reel.
- NEVER LEAVE THE PROJECTOR WHILE IT IS RUNNING.
Safety precautions:
- Disconnect the power cord when checking fuses or changing lamps.
- NEVER LEAVE THE PROJECTOR WHILE IT IS RUNNING.
- Do not use worn or frayed power cords.
- Secure projector and speaker so that there is no danger of them being knocked over.
- Keep the speaker and power cords out of aisles whenever possible.
- Do not clean projector gate or sprockets while machine is running.
- If a film breaks while running:
o switch off the lamp
o stop the machine - Do not use tape to join the broken ends. Re-thread the film leaving sufficient to wind around the take-up reel. Mark the position of the film break by inserting small piece of paper. Leave note showing in the film can that the film is damaged.
Troubleshooting a 16mm projector
Problem | Cause | Solution |
| No sound | Exciter lamp burned out. Projector is on silent speed. Projector is set for magnetic sound. | Replace bulb. Turn to sound speed. Turn to optical sound. |
| Inadequate volume | Lint or dust on sound track. | Have film cleaned. Replace lamp. Turn up volume control. |
| Fluttery movement on film | Lost film loop | Stop projector; readjust lower and upper loops |
| Sound fluttery | Improper film loops. Film not tight over sound drum. | Stop projector; readjust lower and upper loops. Stop projector and tighten film on drum |
| Dim pictures | Room is too bright | Relocate screen; place against windows or in the corner of the room |
| Parts of two pictures on screen | Improper framing | Adjust framing device on projector. |
| Lamp is burned out. Lens cover is closed. Power cord not plugged in. | Replace bulb. Open lens cover. Plug in cord. |
Thursday, June 4, 2009
Projection systems
Introduction
Simple projection systems require light to pass through an image stored on a transparent film, then through a magnifying lens system, and finally projected onto a screen for viewing.
As systems become more complex, the light from the lamp may pass through a series of lenses before reaching the film. These lenses – or condensers – collect and direct the light so that as much as possible passes through the whole area of the film, then onto the magnifying lens. Reflectors behind the lamp also ensures that all light from the lamp is directed toward the film.
Overhead projector
How it works
The overhead projector is very simple to operate and maintain. A light source is directed through a piece of transparent acetate (the transparency or film) or a liquid crystal display (LCD) panel, and the image is then projected onto a screen. An LCD panel can be used for projecting anything on a computer screen – e.g. text, data, graphics and animation.
If the light source is a quartz halogen lamp (see diagram below), it may either have a separate concave reflector or the reflector may be part of the lamp. The light is directed to a Fresnel lens which condenses the light and directs it through a glass plate or stage on which rests the film or LCD panel. The light shines through the image and is collected by lenses at the head assembly. Some overhead projectors have the mirror needed to project the image as a separate part of the head assembly. Others have the mirror as an integral component of the projection lenses in the head assembly. Several methods are used for focusing. Whatever method is used, there will be a focus knob. Some overhead projectors are focused by moving the head assembly up and down the post, others by moving the post up and down, and still others by rotating the projection lens in its carrier.
Because of the heat output of the lamp an overhead projector usually has a fan assembly. Some fans turn on and off with the lamp switch, others are turned off by a thermostatically controlled switch. To prolong lamp life, allow the fan to cool the lamp.
Many overhead projectors have a safety device to stop the power to the unit when the lid is open. When the lid is open (or even ajar) the lid switch is disengaged. The lamp does not work and the fan does not run. When the lid is properly shut, the lamp and fan both operate.
Activity
Examine an overhead projector, and identify the following parts. Your overhead may not have all these parts or controls.
- lamp on/off switch
- fan on/off switch
- lamp
- reflector
- Fresnel lens
- stage
- arm
- post
- mirror (may be part of the head assembly)
- projection lens(may be part of the head assembly)
- head assembly
- focus knob
- fan
- lid safety shut-off switch
Setting up
Regardless of the model, here are some principles to follow when setting up an overhead projector (OHP).
- Place the OHP on a table, stand or trolley where it will not be bumped or knocked.
- Place the OHP so that it faces the screen. The presenter will face the audience. Make sure that the OHP does not block the presenter’s view of the audience.
- Plug the unit into the power point, using an extension cord if you need to.
- Make sure that the power cord and extension cord are out of the way of people stepping over them. If you cannot run the power cord around the edge of the room, either tape it to the floor or cover it with a mat.
- Turn the unit on at the controls. Some OHPs have separate controls for the fan and the lamp.
- Before the audience arrives, test the OHP to ensure that the lamp is working.
- Check the projected image in all areas where the audience will sit. If the projected image is wider at the top than at the bottom (vertical keystoning), either raise the OHP to reduce the angle of the head assembly to the screen, or tilt the screen forward. If the projected image is wider at one side than the other (horizontal keystoning), move the OHP so that it squarely in front of the screen.
- Adjust the focus so that all areas of the projected image are focused.
- Turn off the lamp.
- After use loosely coil the power cord. Many OHPs have hooks for you to wind the power cord around.
- Keep the OHP covered when it is not in use to keep it free from dust.
Care and maintenance
- Do not place the projector in a place where sunlight may shine on it directly, as the heat may warp the Fresnel lens.
- Never carry the projector by the projector arm or post.
- Keep all components in the light path clean and free from dust. Clean using a lint-free cloth and gentle window cleaner.
- Ensure that the Fresnel lens is installed the right way up. There will be an indication on the lens as to which way to install it. If it is not installed correctly the light will be concentrated through the centre of the image but not around the edges. You will see projected a bright circle on a dark background.
- All parts in the light path must be inspected and replaced where necessary – e.g. a scratched lens must be replaced to obtain the best projected image.
- Ensure that the lamp works. Replace the main lamp and spare according to the manufacturer’s guidelines and your organization’s policy. Take care not to touch lamps with bare fingers. Many organizations require that a spare lamp is always available with equipment. Others have a policy of not keeping spares with equipments to reduce pilfering or incorrect replacement if the equipment is available to the public.
- Inspect the power cord and plug for electrical safety.
- Keep the fan assembly free from dust by dislodging dust with a small brush and vacuuming inside the cabinet.
- Do not move the projector while the lamp is still hot. Allow the fan to cool the unit first.
Troubleshooting
Complete the following table, suggesting possible solutions to operating problems. You may find it useful to refer to a user manual.| Problem | Possible solution |
| No light after turning power on | Plug projector in |
| Dark edge with light in the centre of the projected image | Place Fresnel lens correctly |
| Dark spot on screen | Clean dirty compartments Check for warped Fresnel lens |
| Inability to focus entire image | Check for warped Fresnel lens Ensure focus knob is operational Check for broken projector arm |
| Not enough light on screen | Clean Fresnel lens/lamp glass Replace old/broken lamp |
Wednesday, June 3, 2009
Non-print equipment & services: Video data projectors
A data/video projector is a device that allows you to project the screen image from a computer, or a video from a VCR, or DVD onto a larger screen for group viewing. In the past an LCD (liquid crystal display) panel that fit on an overhead projector was often used to project computer images. These required that the room be practically dark. Newer projectors are self-contained systems that allow use in lighted room conditions.
Large screen video projection technology has been in existence since the early 1970’s. Its original application were the display of video inside Boeing passenger planes and projection of the ground/sky horizon outside the cockpit of fighter aircraft training simulators.
Currently there are at least three types of data/video projectors: LCD (liquid crystal display) based models, DLP (digital light processing) models and LCOS (liquid on silicon) models.
LCD projectors: Use a lamp to shine through coloured liquid crystal panels and then through a lens. Each dot (pixel) is capable of turning on and off to create a colour. The more pixels per panel, the higher the resolution and the better the image.
- Offers the best colour reproduction.
- Currently LCD projectors are the most popular choice no matter the application
DLP projectors: A propriety technology developed by Texas Instruments. A DLP (digital light processing) chip is a reflective surface of thousands of tiny movable mirrors which reflect light from the lamp through a lens onto the screen.
- Most compact, some weigh only 3 pounds.
LCOS projectors: Hybrid between LCD and DLP. Most popular version of LCOS termed D-ILA (direct drive image light amplifier).
- Currently largest and heaviest of the three types.
- Smoothest video image.
When used as a data projector, “always attach the cable from your computer to the projector first. Then turn on the projector before turning on your computer. In most cases the computer will detect the projector as an external monitor and it will set itself up automatically. By doing things in this order you will avoid having to figure out the proper keystrokes required on most laptops to get things working.”
United Visual. Does it matter which I turn on first, my projector or my computer? http://www.unitedvisual.com/2tips/2tvp102.asp
Additional information
*Broida, Rick. “Should you choose a DLP or LCD projector?” District Administration, Sep 2003, Vol 39 issue 9, p52, 2/3 p. [required reading] http://www.districtadministration.com/viewarticle.aspx?articleid=736
Collins, Christian. “Rapid Advances Fuel Race for Projection Engine Dominance.” Pro AV Magazine, August 2003. http://dev.proavmagazine.com/Currentproav/feature2.htm not currently available online.
Powell, Evan. The Great Technology War: LCD Vs. DLPhttp://www.projectorcentral.com/lcd_dlp.htm
Subscribe to:
Posts (Atom)