When dry mounting, the object and source of the paper can be of any type, such as newspaper articles, magazine articles, drawings, etc.
First the tissue (glue sheet) is placed over the foam backing and a small amount is left on the edges for the cropping stage. The source is then placed on the foam backing where it will be tacked down. A small piece of release paper is then placed over the source and the hot tacking iron (180 degrees) is used to spot glue the picture to the foam backing. This is done so that when the backing is lifted with the source on it, the source does not shift or fall off when transferring it to the press.
After tacking, the tissue can then be trimmed. Now you can either trim the source at this stage or wait until after the source has been placed in the press. The source with the backing is then cut to the desired size or shape either by very large sharp straight line cutters or by using specifically designed scissors for shaping the media.
The media is then placed into the press. First, there is a quarter piece of releaseboard placed at the bottom layer of the press. Another piece of release board is then placed on top of the media to protect it from the top layer of the press. The press is then closed and the media is left in for a pre-determined amount of time.
With the release boards in place, the media has very little chance of being burned, but it is still safer to watch the amount of time the media is in the press.
Presses come in all sizes from 12 inches by 12 inches to 24 inches by 30 inches for full posters. These presses can be opened on two sides or three depending on the application.
If the client prefers, the laminate can be added after the media comes out of the press. Laminates are mostly used as a protective coating and come in many types such as non-glare, semi-glare, high gloss, linen, and even canvas.
Before placing the laminate on the media, use a small perforator to make extremely small holes to assist with the fusing of the plastic to the media. The perforator has very small sharp spikes on it and is rolled over the sheet of laminate. This also prevents bubbling when media is placed in a flat area.
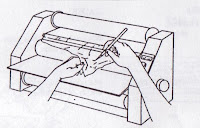
There is also a roll type laminator that has a flat bed at the front and the media is actually fed into the front and the laminate is rolled onto the media using very high heat.
When copying newspaper articles to be dry mounted, newspapers have that very thin paper, with an off-white tinge and sometimes the ink is not too clear aand articles or pictures bleed through.
To make a clean white copy, first change the tone of paper making it whiter, before preventing bleed through. This can be achieved by placing the original on the glass then covering it with a black piece of paper. This will prevent the glare from showing up on the copy when the light source passes over the original during copying.
The same is try for dry mounting. To prevent bleed through over time, when dry mounting black type on white paper, a black foam is used instead of the standard white form backing.
Tuesday, July 14, 2009
Thursday, July 9, 2009
Laminators
Laminating is the process of encasing and sealing material in plastic film. Heat and pressure are used in this process. The plastic film protects your material from damage and deterioration.
Many kinds of material—from onionskin to cardboard, wood, and cloth—can be laminated. The rougher the surface, the better the lamination. Those materials that do not laminate well permanently are:
• High-enamel papers such as those used in many magazines
• Other papers with a slick finish
• Smooth metallic, plastic, chalk-covered, or crayon surfaces
• Some photographic paper (it may scorch or melt)
• Moist materials (they cause bubbles on the laminated surface)
Laminating machine features are as follows:
1. Machines come in various widths, from 9 inches to 60 inches wide; the average is 12 inches.
2. Most machines will laminate only light materials, while others will accept a range of materials from a few thousandths of an inch to an eighth of an inch thick.
3. Machines come with one speed or with variable speed. The variable speed adjustment allows heavy materials to be fed in more slowly than light ones.
4. Know your machines. Label the various parts and their functions on the machine itself.
Operating tips.
1. Give yourself plenty of time when laminating.
2. Use the OFF button in case of problems. Do not panic. Many laminating problems can be solved with patience and careful handling.
3. Have available an Exacto knife and fine-grained copper wall pad in case of problems.
4. To prevent jamming of film, when first feeding the material, be prepared to grasp immediately and firmly take hold of the laminated product as it exits the machine. This is very important.
Problems
| Problem | Cause | Solution |
| PROBLEM Product problems | ||
| 1. Blisters, bubbles, or one large area that has not adhered properly. | Machine too cool. | Let machine warm longer. Remove film from material if possible. Relaminate. |
| Dry laminating rollers. | Clean with rubber eraser, or lightly rub with fine-grained copper wool pad. Relaminate. | |
| Excessive moisture in material. | Reduce moisture before laminating: place in warmed dry-mount press at 225 degrees for 30 seconds. After laminating: prick bubbles with pin; then seal film with tacking iron or, for large areas, place in dry-mount press. | |
| Material slick, or powdery surface (chalk or pastels). | Will never laminate well. |

| Problem | Cause | Solution |
| Wrinkles | Wrinkles cannot be eliminated. | |
| Need machine adjustment for wrong tension, too much heat, nonfunctioning cooling fan, or wrong pressure for laminating and pull rollers. | Remove film from your material. Make machine adjustments where possible, or take in for repair. Make adjustments only if the knob or switch is easily accessible. Do not touch the inside of the machine. Relaminate. | |
| Dirty laminating rollers. | Clean with rubber eraser, or rub lightly with fine-grained copper wool. | |
| Tried to reposition material after it was fed into machine. | Material cannot be repositioned once it has been engaged by laminating rollers. | |
| Forced material into machine. | Feed only at motor take-up speed. | |
| Wrinkles appear at glued areas when lightweight glued to heavyweight material. | Glue only at leading edge. | |
| Poor seal at edges. | Adjust machine for temperature too cool, speed too fast, or laminating roller pressure on variable speed models. | Make necessary adjustments where possible, or take in for repair. Make adjustments only if the knob or switch is easily accessible. Do not touch the inside of the machine. Then, relaminate, or use tacking iron to seal edges, put in dry-mount press at 270 degrees to 250 degrees. |
| Material wider than your laminating film. | Trim material and relaminate, or use wider laminator with wider film, or see problem below. |

| Problem | Cause | Solution |
| Laminating oversized materials. | Material too large for width of machine. | Method 1: You may laminate material twice the size of the machine. Fold material in half. Place it on feed table close to edge of film. Laminate. Trim three sides. Do not trim folded side. Refold your material inside out and repeat as above. When you open the finished product, tack down any loose film on fold line using tacking iron. |
| Method 2: (see figure) Cut the material into major pieces. Laminate each piece separately. Align laminated parts to restore original figure. Patch parts together with clear tape, or cut pieces of laminating film to patch parts together. Use tacking iron or clothes iron set on Delicate to laminate patches into place. |

| Problem | Cause | Solution |
| Two separate items accidently overlap and are laminated together. | Materials were too close to each other when fed into machine. | Use Exacto knife to cut through film overlap front and back. Separate materials gently. Relaminate individually, leaving at least a half-inch of clear film between items. |
| Curling of finished lamination. | No heavy weight placed on finished lamination. | After using solutions to problems following, place laminated material under heavy weight until cool. |
| Unbalanced tension in pull rollers or supply rollers. | Make necessary machine adjustments where possible or take in for repair. Make adjustments only if the knob or switch is easily accessible. Do not touch the inside of the machine. | |
| Uneven heat. | Make necessary machine adjustments. Make adjustments only if the knob or switch is easily accessible. Do not touch the inside of the machine. Then relaminate upside down. | |
| Where available, heating shoes not clean. | Clean the material gently with fine-grained copper wool pad. Relaminate. | |
| Excessive moisture in material. | Place the material in warmed dry-mount press at 225 degrees for 30 seconds. Then remove and place heavy book on top. Relaminate. | |
| Machine problems. 7. No power. | Machine not plugged in. Blown fuse in machine. | Plug machine into AC outlet. Check power in wall outlet. Replace machine fuse. Fuse is usually found on back of machine or where rollers are located. |
| 8. Laminating film jams in machine (most common problem) | Failure to grasp film when it first emerges from machine. | Unjam roller. Press OFF. Don’t panic. Work slowly and patiently. Determine whether laminating rollers or pull rollers are jammed with film. On front of machine, cut away film into machine from both top and bottom supply rollers. Remove jammed film as follows: First try: With machine OFF, grasp loose ends of film at roller end and pull with force! Second try: With machine on RUN, grasp loose ends of film, removing as much film as possible while the rollers turn. Last resort: Cut/run/preheat technique: 1. Using Exacto knife, carefully cut into film from laminating roller, without touching roller. 2. Detach film from roller. 3. If possible, holding film with one hand at exit, briefly press RUN, remove as much film as you can, then press PREHEAT to stop machine. 4. Repeat procedures 1 through 3 as many times as necessary. 5. Before reusing machine, extract all jammed film and press PREHEAT to warm machine. |
| 9. Gummy substance accumulates on laminating rollers. | Poor alignment of top and bottom laminating film. Heat melts adhesive of overlapping film onto rollers. | Remove gummy polyethylene from roller with rubber eraser, or lightly rub with fine copper wool pad. Align top and bottom film of supply rolls parallel to each other and matching end to end. |

In-depth
1. Major parts of the laminator
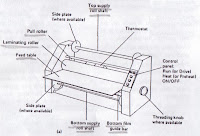
A. A laminator has a feed table and two sets of each of the following parts—one set for top and one set for bottom lamination.
B. Supply rolls—contain new laminating film.
C. Guide bars—keep the film flowing properly from the supply rolls to the laminating rollers.
D. Laminating rollers—provide the laminating process.
E. Pull rollers—pull the laminated product away from the laminating rollers in order for product to exit the machine.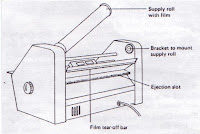
2. Operating laminator
A. Before laminating your material:
1. Check that the material is smaller than the laminator, to allow for proper seal around the edges.
2. If the material is damp, or if it is a damp day, dry the material before laminating. Wrap the material in an envelope of brown wrapping paper, art paper, or blank newsprint. Insert in a dry-mount press at 225 degrees for 30 seconds. Instead of a press, you may substitute a variable speed laminator set at slowest speed.
3. Always run a sample of your type of material. If you change material, run another test. If it does not feed easily, it is too thick.
B. Setting up the laminator
1. Connect the power cord.
2. Press Preheat or Heat to warm the unit.
3. Depending on the machine, the light will either come on or go out when the machine is ready.
C. Feeding material in the laminator.
1. Press Run or Drive to start the laminating rollers.
2. To prevent jamming, when first feeding material, feed with one hand and hold the other hand at the exit to grasp the material as it comes out. When it exits the laminator, it will be completely sealed.
3. Feed material continuously at the laminator speed. Do not push. Leave a half-inch between what was just inserted and the next material to be laminated.
4. If necessary, smooth out the surface of the material, working from the center toward the edges closes to you.
5. When the material is engaged by the rollers, you cannot reposition the material on the feeding table. Wrinkles will occur if any changes are made.
6. Do not stop the machine while the material is engaged by the laminating rollers; otherwise, a pressure mark on the finished product will occur at the stopping point.
D. For temporary stop:
1. Before stopping, make sure that the material is out of the machine and past the tear-off bar.
2. While still on Run, insert a thin cardboard until it is halfway between the entrance and exit slots.
3. Press Preheat, Heat, or Stop, whichever is applicable, to stop the machine.
4. Do not let the machine stand for thirty minutes without using it. Switch it off.
5. On some units, wait two minutes to press Run or Drive is the machine is turned off and back on quickly.
E. After laminating has been completed:
1. Press off.
2. Cut off the material, leaving a few inches of film past the exit slot.
3. Trim the edges of the product with scissors or paper cutter, leaving an eighth-inch margin of laminated film all around for total seal.
3. Using new film
A. Ordering film—four factors are important:
1. T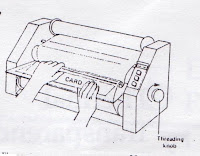 hickness of film (average is 0.0015 millimeters)
3. Width of film (should be smaller than shaft width)
4. Diameter of film core (sizes are 1 inch and 2 ¼ inches; average is 1 inch)
5. Manner in which the film is wound on the roll (determine whether the shiny or dull side of the film shows on top of the old roll before discarding it).
B. Knowing when film is running out:
To alert you, a paper label appears on film within 2 feet of the end of the supply roll. Either use the film until the end, or cut and replace the old rolls at that point. Save end-of-film remnants. They can be used for patching together oversized materials that must be laminated in sections.
C. Loading film:
NOTE: Both supply rolls of film should be changed at the same time, even if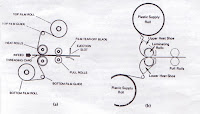 only one roll is empty.
1. To remove old supply rolls, turn the machine to PREHEAT or HEAT.
Remove the feed table from the laminator.
Remove the empty supply rolls from the machine. If one roll still has film feeding into the machine, use scissors or an Exacto knife to cut the remaining film from the supply roll. Remove the roll.
If there is film already on the laminating rolls, allow it to run through the machine.
Hold onto the film as it exits the machine. Press RUN.
Press OFF when all of the film is out of the machine.
Where applicable, remove the metal side plates on both supply rolls.
Remove the shaft from both supply roll cores.
2. When inserting new supply rolls and threading, the laminator should be OFF.
Supply rolls: Lay the new supply rolls out in front of the machine. Unwind some film from each. Note that once the supply rolls are on the machine, the dull sides of the film must meet where the laminating rolls meet. If you are not sure which is the dull adhesive side, place the roll on a table. The film will curl toward the adhesive side.
Shafts: Check the way the shafts fit into the machine. They will only go in one way.
Insert a shaft into each new supply roll.
Where applicable, replace the metal side plates after the supply rolls are on the shafts. If the plates fit too loosely, they may be inside out. Replace a plate on the thin end of the shaft first.
Replace each shaft with a roll on the machine.
Check that the top and bottom supply rolls are exactly aligned with each other, matching end to end. They must also be aligned with the laminating rollers. Check that the dull sides of the film will meet at the laminating rollers.
Guide bars: Depending on your model, the film should go over or under the guide bars, actually touching the guide bar when ready to feed into the laminating rollers. There is a top guide bar and a bottom guide bar; the bottom guide bar is sometimes hard to locate.
Patience will triumph.
D. Engaging the film in machine before replacing the feed table:
1. Unwind some film from both the top and bottom rollers.
2. Overlap the film so that the edge of the film for the top supply roll extends almost to the bottom supply roll, and vice versa. Carefully overlap and wrap both film layers inside each other a couple of times.
3. Hold the wrapped-up film with your left hand where the laminating rollers meet.
4. With your right hand, insert and push a thin sheet of cardboard against the overlapping rollers. This forces the overlapping films between the rollers.
5. If your laminator has a THREADING KNOB, usually found on the right side of the machine, turn it clockwise until the cardboard is gobbled up by the laminating rollers. This action sometimes requires brute strength. When the film is engaged, let the knob go.
6. Press PREHEAT or HEAT.
7. Press RUN when the machine is ready.
8. Grasp the cardboard quickly as it exits the machine. Press OFF.
NOTE: If the cardboard does not exit, the THREADING KNOB, where available, is not turned enough, or one laminating roller may have the overlapped film wrapped around itself. Cut the film from that roller, pull out more film. Put it where the rollers meet at the front of the machine. Press RUN. When the cardboard exits, be ready to grasp it quickly. Immediately press OFF.
9. Press PREHEAT or HEAT, and allow the machine to warm up.
10. If there are wrinkles on the film of the top laminating roller, center the top supply roll on the machine.
11. Press RUN or DRIVE to test that the film is laminating properly and that it is wrinkle-free.
12. Cut the film-encased cardboard, leaving a few inches of film at the exit point.
13. Install the feed table.
14. The machine is now ready to laminate your material.
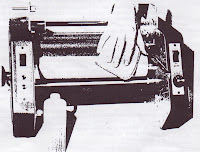
IV. Cleaning the machine.
Clean while the machine is warm but unplugged (see Figure.)
A. Laminating and pull rollers:
1. For light deposit of gummy polyethylene substance, use an ordinary rubber eraser, or use a special polyethylene remove available from your dealer. Wipe on with a soft rag.
2. For heavy deposits, gently rub a fine-grained copper wool pad on the rollers until the polyethylene balls up and can be picked off by hand.
B. Heating shoes with nonstick surface (used in Laminex and Index machines):
1. Use a special polyethylene liquidremover available from your dealer. Wipe on with a soft rag.
2. Try fine-grained steel wool pad number 00 or finer. Rub very lightly; then blow away particles with compressed air (available at a camera dealer).
1. Major parts of the laminator
A. A laminator has a feed table and two sets of each of the following parts—one set for top and one set for bottom lamination.
B. Supply rolls—contain new laminating film.
C. Guide bars—keep the film flowing properly from the supply rolls to the laminating rollers.
D. Laminating rollers—provide the laminating process.
E. Pull rollers—pull the laminated product away from the laminating rollers in order for product to exit the machine.


2. Operating laminator
A. Before laminating your material:
1. Check that the material is smaller than the laminator, to allow for proper seal around the edges.
2. If the material is damp, or if it is a damp day, dry the material before laminating. Wrap the material in an envelope of brown wrapping paper, art paper, or blank newsprint. Insert in a dry-mount press at 225 degrees for 30 seconds. Instead of a press, you may substitute a variable speed laminator set at slowest speed.
3. Always run a sample of your type of material. If you change material, run another test. If it does not feed easily, it is too thick.
B. Setting up the laminator
1. Connect the power cord.
2. Press Preheat or Heat to warm the unit.
3. Depending on the machine, the light will either come on or go out when the machine is ready.
C. Feeding material in the laminator.
1. Press Run or Drive to start the laminating rollers.
2. To prevent jamming, when first feeding material, feed with one hand and hold the other hand at the exit to grasp the material as it comes out. When it exits the laminator, it will be completely sealed.
3. Feed material continuously at the laminator speed. Do not push. Leave a half-inch between what was just inserted and the next material to be laminated.
4. If necessary, smooth out the surface of the material, working from the center toward the edges closes to you.
5. When the material is engaged by the rollers, you cannot reposition the material on the feeding table. Wrinkles will occur if any changes are made.
6. Do not stop the machine while the material is engaged by the laminating rollers; otherwise, a pressure mark on the finished product will occur at the stopping point.
D. For temporary stop:
1. Before stopping, make sure that the material is out of the machine and past the tear-off bar.
2. While still on Run, insert a thin cardboard until it is halfway between the entrance and exit slots.
3. Press Preheat, Heat, or Stop, whichever is applicable, to stop the machine.
4. Do not let the machine stand for thirty minutes without using it. Switch it off.
5. On some units, wait two minutes to press Run or Drive is the machine is turned off and back on quickly.
E. After laminating has been completed:
1. Press off.
2. Cut off the material, leaving a few inches of film past the exit slot.
3. Trim the edges of the product with scissors or paper cutter, leaving an eighth-inch margin of laminated film all around for total seal.
3. Using new film
A. Ordering film—four factors are important:
1. T
 hickness of film (average is 0.0015 millimeters)
3. Width of film (should be smaller than shaft width)
4. Diameter of film core (sizes are 1 inch and 2 ¼ inches; average is 1 inch)
5. Manner in which the film is wound on the roll (determine whether the shiny or dull side of the film shows on top of the old roll before discarding it).
B. Knowing when film is running out:
To alert you, a paper label appears on film within 2 feet of the end of the supply roll. Either use the film until the end, or cut and replace the old rolls at that point. Save end-of-film remnants. They can be used for patching together oversized materials that must be laminated in sections.
C. Loading film:
NOTE: Both supply rolls of film should be changed at the same time, even if
 only one roll is empty.
1. To remove old supply rolls, turn the machine to PREHEAT or HEAT.
Remove the feed table from the laminator.
Remove the empty supply rolls from the machine. If one roll still has film feeding into the machine, use scissors or an Exacto knife to cut the remaining film from the supply roll. Remove the roll.
If there is film already on the laminating rolls, allow it to run through the machine.
Hold onto the film as it exits the machine. Press RUN.
Press OFF when all of the film is out of the machine.
Where applicable, remove the metal side plates on both supply rolls.
Remove the shaft from both supply roll cores.
2. When inserting new supply rolls and threading, the laminator should be OFF.
Supply rolls: Lay the new supply rolls out in front of the machine. Unwind some film from each. Note that once the supply rolls are on the machine, the dull sides of the film must meet where the laminating rolls meet. If you are not sure which is the dull adhesive side, place the roll on a table. The film will curl toward the adhesive side.
Shafts: Check the way the shafts fit into the machine. They will only go in one way.
Insert a shaft into each new supply roll.

Where applicable, replace the metal side plates after the supply rolls are on the shafts. If the plates fit too loosely, they may be inside out. Replace a plate on the thin end of the shaft first.
Replace each shaft with a roll on the machine.
Check that the top and bottom supply rolls are exactly aligned with each other, matching end to end. They must also be aligned with the laminating rollers. Check that the dull sides of the film will meet at the laminating rollers.
Guide bars: Depending on your model, the film should go over or under the guide bars, actually touching the guide bar when ready to feed into the laminating rollers. There is a top guide bar and a bottom guide bar; the bottom guide bar is sometimes hard to locate.
Patience will triumph.
D. Engaging the film in machine before replacing the feed table:
1. Unwind some film from both the top and bottom rollers.
2. Overlap the f
ilm so that the edge of the film for the top supply roll extends almost to the bottom supply roll, and vice versa. Carefully overlap and wrap both film layers inside each other a couple of times.3. Hold the wrapped-up film with your left hand where the laminating rollers meet.
4. With your right hand, insert and push a thin sheet of cardboard against the overlapping rollers. This forces the overlapping films between the rollers.
5. If your laminator has a THREADING KNOB, usually found on the right side of the machine, turn it clockwise until the cardboard is gobbled up by the laminating rollers. This action sometimes requires brute strength. When the film is engaged, let the knob go.
6. Press PREHEAT or HEAT.
7. Press RUN when the machine is ready.
8. Grasp the cardboard quickly as it exits the machine. Press OFF.
NOTE: If the cardboard does not exit, the THREADING KNOB, where available, is not turned enough, or one laminating roller may have the overlapped film wrapped around itself. Cut the film from that roller, pull out more film. Put it where the rollers meet at the front of the machine. Press RUN. When the cardboard exits, be ready to grasp it quickly. Immediately press OFF.
9. Press PREHEAT or HEAT, and allow the machine to warm up.
10. If there are wrinkles on the film of the top laminating roller, center the top supply roll on the machine.
11. Press RUN or DRIVE to test that the film is laminating properly and that it is wrinkle-free.
12. Cut the film-encased cardboard, leaving a few inches of film at the exit point.
13. Install the feed table.
14. The machine is now ready to laminate your material.
IV. Cleaning the machine.
Clean while the machine is warm but unplugged (see Figure.)

A. Laminating and pull rollers:
1. For light deposit of gummy polyethylene substance, use an ordinary rubber eraser, or use a special polyethylene remove available from your dealer. Wipe on with a soft rag.
2. For heavy deposits, gently rub a fine-grained copper wool pad on the rollers until the polyethylene balls up and can be picked off by hand.
B. Heating shoes with nonstick surface (used in Laminex and Index machines):
1. Use a special polyethylene liquid
remover available from your dealer. Wipe on with a soft rag.2. Try fine-grained steel wool pad number 00 or finer. Rub very lightly; then blow away particles with compressed air (available at a camera dealer).
Glossary
Core Hard cardboard roll around which laminating film is wrapped.
Heating shoes See Shoes.
Nip Slit or space between the top and bottom laminating rollers where material is fed for lamination.
Off Control used when lamination is finished.
Preheat or Heat Control used to warm up the machine.
Roller, rolls See InDepth 1, Major parts of the laminator.
Run or Drive Laminating controls. When Run is pressed, the film will feed into the machine. Lamination can begin if the machine has reached proper temperature.
Shaft Metal rod inside each supply roll that suspends the supply rolls on the machine.
Shoes Panels that provide the heat for lamination on some machines.
Side plates Circular metal plates on some machines that hold the shaft and supply rolls securely to each other.
Tacking iron A small, hand-held accessory usually used in conjunction with the dry-mount press. When warm and applied to a heat-sensitive adhesive surface, it tacks or bonds this surface to another.
Threading knob Found on some machines, used to carry sample cardboard through the machine before starting regular lamination with new rolls of film.
Wednesday, July 8, 2009
Dry-mount press
The dry-mount press is a versatile piece of equipment that joins materials together through heat, pressure, and a heat-sensitive binding agent instead of ordinary paste, glue, or cement. The press comes in several sizes from 8 ½ by 11 ½ inches to 26 by 32 inches. You can perform four functions with the press:
The thermostats are not always accurate. Check the press temperature by placing a square metal thermometer at the edge of the lid when shut. A candy thermometer will do fine, or use the sizzle test: with your moistened finger, touch the platen. A slight sizzle indicates just right for dry mount. No sizzle tells you to let the machine get warmer. A loud sizzle says to allow it to cool down for dry mount.
II. Procedures for dry mounting
Equipment and materials: dry-mount press, tacking or clothes iron, scissors and/or paper cutter, your material, mounting board (such as poster board), dry-mount tissue, envelope of blank newsprint, brown paper, or art paper.
 A. Select your material. Do not trim.
B. Pre-heat the dry-mount press and the tacking iron.
C. Put the material face down. Place the dry-mount tissue on the back of the material.
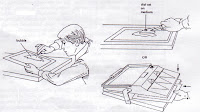
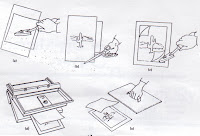
D. Use the tip of the iron to tack the tissue to the material. Tack at the centre and three-quarters of the way toward each corner. Think of a small x pattern. Do not tack at the corners. see Figure 5-1a.
E. Trim the material and the tissue to the same size. see Figure 5-1b.
F. Place the material on top of the mounting board. Center or position the material. Separate the picture from the loose tissue at the corner. Place the corner of the tissue against the mounting board while holding the picture in place. Touch the iron to the tissue so it will adhere to the mounting board. Repeat at one other corner. Omit this step for extra wide and long materials. see Figure 5-1c.
G. Wrap the material and the mounting board in blank newsprint, brown paper, or art paper envelope to protect it. You may also use release paper, which is a commercially available product. Place the waxed side next to your material.
H. Place in the dry-mount press. The material to be dry mounted should face up. Keep in the press at 224 degrees for 30 to 45 seconds. see Figure 5-1d.
I. Remove and inspect the materials for bubbles. Insert again if more heat is needed.
J. Place a heavy weight on the mounted material until cool. see Figure 5-1e.
K. The material is now ready to use.
L. Turn the dry-mount press off. Unplug the tacking iron.
III. Cleaning the machine
For stubborn deposits on the platen, use fine-grade emery cloth available at a hardware store, fine-grade (00 or 000) steel wool, or a razor blade. Wipe clean with soft damp cloth. Avoid marring the platen.
- Mount material on a firm backing—useful for photographs, painting, fabrics, and so on.
- Mount material on a flexible cloth backing to keep it pliable but tear-proof—useful for maps and charts that you want to roll.
- Laminate—especially useful for thick materials, such as plywood or masonite, which do not fit into an automatic laminating machine.
- Make transparencies through a heat-lifting process for overhead projector use.
The press has a thermostat control to set the temperature for each function.
Operating tips
- Before closing the press, cover the material with a heavy sheet of paper larger than the original so that no ridge marks will appear on the finished product. Blank newsprint provides good protection.
- For thick materials, know the maximum thickness of material that your machine will accept. Usually, presses can dry mount fairly thick boards.
- For thin materials, place a few sheets of cardboard in the press beneath the pad on which you place the material.
- For wide and long materials, use materials up to twice as wide as your material and of indefinite length. For long materials, start at the center and work toward either end. For wide and long materials, tack the material to dry-mount tissue, but do not tack it to the mounting board before dry mounting. This will help to prevent wrinkles on the final product.
Problems
| Problem | Cause | Solution |
| Air bubbles. | Moisture in either material or mounting board. | Wrap mounting board and material in brown wrapping-paper or art paper envelope. Place both mounting board and material in press for 30 seconds at 225 degrees. Remove, and prepare for mounting. |
| Thick material. | Keep in press longer. | |
| Not enough pressure. | Add some cardboard backing. Dry mount again. | |
| Wrinkles during dry-mount press lamination. | Wrinkles cannot be eliminated. | Use solutions below to prevent future wrinkles. |
| Film tacked to material before laminating. | Do not tack film to material before laminating. | |
| Insufficient heat. | Leave in press long enough. | |
| Surface of material not smoothed as it is placed in press. | Laminate one side at a time. Smooth material before mounting. Wrap in brown paper envelope before laminating. | |
| Material being laminated is soft. | Put cardboard under dry-mount press pad on which you lay material. | |
| Curling or warping of finished product. | Moist when put into press. | Before mounting, dry material in press for 30 seconds at 225 degrees. |
| Need pressure on finished product. | After mounting, place heavy book on material until cool. |
In-depth
I. Temperature settings
It takes about 11 minutes to warm up the press to 225 degrees.
Times and temperature in the table are approximate. Initially, use the minimum time and temperature necessary. You can always increase these or return your material to the press for a better job.
I. Temperature settings
It takes about 11 minutes to warm up the press to 225 degrees.
Times and temperature in the table are approximate. Initially, use the minimum time and temperature necessary. You can always increase these or return your material to the press for a better job.
| Function | Temperature setting | Backing material or tissue | Approximate time in press |
| Dry mount | 225°-250° | Dry-mount tissue and mounting board | 30-45 seconds |
| Laminating | 270°-350° | Laminating film | 1 minute + |
| Heat lifting | 270°-350° | Laminating film | 1 minute + |
II. Procedures for dry mounting
Equipment and materials: dry-mount press, tacking or clothes iron, scissors and/or paper cutter, your material, mounting board (such as poster board), dry-mount tissue, envelope of blank newsprint, brown paper, or art paper.
 A. Select your material. Do not trim.
B. Pre-heat the dry-mount press and the tacking iron.
C. Put the material face down. Place the dry-mount tissue on the back of the material.
D. Use the tip of the iron to tack the tissue to the material. Tack at the centre and three-quarters of the way toward each corner. Think of a small x pattern. Do not tack at the corners. see Figure 5-1a.
E. Trim the material and the tissue to the same size. see Figure 5-1b.
F. Place the material on top of the mounting board. Center or position the material. Separate the picture from the loose tissue at the corner. Place the corner of the tissue against the mounting board while holding the picture in place. Touch the iron to the tissue so it will adhere to the mounting board. Repeat at one other corner. Omit this step for extra wide and long materials. see Figure 5-1c.
G. Wrap the material and the mounting board in blank newsprint, brown paper, or art paper envelope to protect it. You may also use release paper, which is a commercially available product. Place the waxed side next to your material.
H. Place in the dry-mount press. The material to be dry mounted should face up. Keep in the press at 224 degrees for 30 to 45 seconds. see Figure 5-1d.
I. Remove and inspect the materials for bubbles. Insert again if more heat is needed.
J. Place a heavy weight on the mounted material until cool. see Figure 5-1e.
K. The material is now ready to use.
L. Turn the dry-mount press off. Unplug the tacking iron.
III. Cleaning the machine
For stubborn deposits on the platen, use fine-grade emery cloth available at a hardware store, fine-grade (00 or 000) steel wool, or a razor blade. Wipe clean with soft damp cloth. Avoid marring the platen.
Glossary
Chartex Cloth backing (the side without cloth is adhesive). Use the dry-mount press at 225 degrees for 5 seconds.
Dry-mounting tissue Special waxy tissue paper coated on both sides with a heat-sensitive adhesive. When sandwiched between the print and the mounting material, it forms a bond between the two.
Fotoflat tissue Dry-mounting tissue that can be removed at a later date so that the original print can be separated from its backing. To dry mount, use the press at 180 degrees. To remove the backing, reheat the material at 200 degrees for one minute, then use a razor blade to separate the material carefully from the mounting board.
Heat lifting A process for making transparencies from paper originals for use with the overhead projector. It is especially helpful for converting magazine pictures into transparencies. Generally, use a magazine page that is clay-coated. Laminate only on the side of the desired picture, not on both sides. Soak laminated product in soapy water. Gently separate or rub away paper from film. The image will remain on the laminating film, and this film is your transparency.
Lamination Heat and pressure process of encasing and sealing material between two layers of plastic film.
Platen Metal surface on the inside cover of a dry-mount press, which conducts heat to your material. Tacking iron Essential accessory to dry mounting. This small iron is used to attach (tack) mounting tissue to your material and to the mounting board before they are put into the press. It is also useful in taking out air bubbles left on the finished product. (If a tacking iron is not available, use the tip of a clothes iron, not on steam setting.)
Tear sheet A term for the material you have selected to be dry mounted.
Kamenshine, Lesley. A/V Troubleshooter. 1985. pp. 22-26.
Tuesday, July 7, 2009
Mount pictures using rubber cement, dry mount
How to…Mount pictures using rubber cement
 Temporary
- Cut picture to size. Edges should be straight and corners square.
o Use a paper cutter/knife for best results.
- Mark location of picture on mounting board with pencil to assist putting picture in correct position.
o Be careful if using construction paper; it bleeds.
Temporary- Apply cement evenly to back of picture.

- Place picture on mounting board before cement dries.
 Burnish the picture for good adhesion and removal of air bubbles.
- Remove excess cement after it dries by rubbing with clean finger or ball of dried cement
- Erase the guide marks

Permanent
- Apply cement evenly to front of mounting board in vertical direction.
- Allow cement to dry until there are no shiny spots.

- Place two sheets of wax paper on mounting board to cover picture area so picture does not adhere in wrong place.
- Align picture with guide marks.
- Carefully remove wax paper while holding picture in aligned position.
 Burnish the picture for good adhesion and removal of air bubbles.
- Remove excess cement after it dries by rubbing with clean finger or ball of dried cement.


Erase the guide marks.
How to…dry mount pictures
1. Dry the mounting board and picture before trimming picture by placing them in dry-mount press for about one minute at 225F. Close press, but do not lock.
2. Place a sheet (either side up) of dry-mounting tissue over the back of the untrimmed picture, with sheet extending beyond the edges of the picture.
3. Attach the tissue to the back center of the picture with tip of a tacking iron set on “medium”. 
4. Turn picture and tissue over and trim both simultaneously to desired size. (A paper cutter works best, but a razor knife and metal straightedge or scissors may be used.)
5. Place the picture and dry mounting tissue on the mounting board and align in proper position.
6. Tack the tissue to the mounting board at two opposite corners.

7. Cover mounting board and picture with clean paper on both sides.

8. Place in dry-mount press preheated to 225F for about one minute.
9. Remove from dry mount press and allow the materials to cool. (Placing the cooling materials under a metal weight will help prevent curling.)
Heinich, Robert et al. Instructional Media and Technologies for Learning. 7th ed.
Monday, July 6, 2009
Non-print equipment & services: Making transparencies
Making an ink jet transparency
- Be sure to use ink jet overhead transparency film.
- Place several sheets of paper in the feed tray of the ink jet printer. Put a mark on top of the top sheet of paper and then print something on it to determine the correct orientation for the ink jet film.
(Most ink jet printers print on the bottom of the paper as it is placed in the tray.) - Put the film on top of the paper in the feed tray. Be sure to orient the film so that the image is printed onto the frosted side.
If the film has a paper feed strip on one end, be sure that the end with the strip feeds into the printer first. - Allow the overhead to dry completely before touching the printed surface.
Making a laser printer or photocopier transparency
- Be sure to use photocopier or laser printer overhead transparency film.
- Place the film on top of several sheets of paper in the feed tray of the copier or printer. If the film has a paper feed strip, put it on top of the end of the film that feeds first.
- Print or photocopy as you would if making a paper copy.
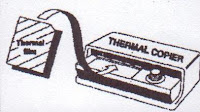
Making a thermal transparency
Single film
- Ensure information on paper original is carbon based.
- Place thermal film on top of original with clipped corner (if film has one) in upper right.
- Adjust heat setting if necessary.
- With film on top, insert materials into slot on copier.
- After copy exits from bottom of machine separate the original from the thermal copy.
Double film
- Do not separate the two films.
- Ensure information on paper original is carbon based.
- Place both films on top of original with the thin film closest to the original.
- Adjust heat setting on machine if necessary.
- With films on top, insert materials into slot on copier.
- After copy exits from bottom of machine separate the original from the thermal copy.
- Remove and discard thin film.
Friday, July 3, 2009
Non-print equipment & services: Techniques for mounting flat materials
Rubber cement
- easy to use
- inexpensive
- cement dries out and thickens when exposed to air for any length of time
- sticking power lessens over time
- can eventually damage and discolour photos
Dry mounting
- Sealing flat materials, e.g. pictures, maps, charts to cardboard, cloth or other surfaces
- a permanent process
- requires heat, pressure, and a heat-sensitive adhesive
- three variables in the process: temperature, pressure, and time
- if either the item to be mounted or the cardboard backing contains moisture, bubbles of steam may form under the item when heat is applied and result in wrinkling
Laminating
The process of encasing and sealing material in plastic film.
- Hot (thermal) lamination most common process
o requires laminating machine
o uses heat and pressure
o applies film to both sides at once - Cold lamination
o used with inks or papers too sensitive for thermal process
o a one-sided process
o cold film more costly
For further info check web page of Ledco (a laminator manufacturer) at http://www.ledcoinc.com
Overhead transparencies
- Variety of methods for creating
o Direct drawing
o Thermal transparency
o Photocopying
o Computer generated transparencies
Direct drawing
- “Overhead projector pens” specially made with translucent inks so light can pass through to reproduce colour of the ink
o Permanent ink requires solvent to remove
o Water based can be wiped off with damp cloth so likely to smear
o Wax based pencils least commonly used as most will only project in black
Producing transparencies
Thermal transparencies
- A heat process which requires a thermal copier and “special” transparency film
- Original must contain heat absorbing material containing carbon e.g. soft lead pencil, India ink, photocopied page, laser printed page
- Two types
o Single film
o Double film
Don’t use - Felt tip markers
- Ballpoint pen
- Wax pencil
- Ink jet printer
Photocopied transparencies
- Electrostatic film process using plain paper copier
o Black and white
o Colour using colour copier
· Correct acetate for brand of copier must be us ed
Computer generated transparencies
- Laser printers
o Black and white
o Colour (colour laser printer) - Ink jet
o Black and white
o Colour
Each type uses a different type of acetate.
Thursday, July 2, 2009
Non-print equipment & services: Equipment selection checklist
1. Select a medium that best meets an instructional or information objective in conjunction with the following considerations:
a. Investigate the technical requirements of the users along with their needs for information production and delivery.
b. Investigate media format availability.
2. Contact distributors of required equipment type or format:
a. Identify distributors that sell the equipment type and models that are required.
b. Request of each distributor:
(1) literature, price quotations, and demonstrations on the equipment;
(2) information on the cost of the equipment, added features and supplies; and
(3) information on equipment service contracts and rates of repair.
3. Evaluate equipment:
a. Evaluate and compare equipment models using distributor information and information from media literature.
b. Obtain evaluative reports from people in libraries, schools and businesses who are using the equipment in question.
c. Contact technicians who work through independent service centres for information on breakdown rates, parts availability and ease of repair.
4. Evaluate and select through the process of elimination:
a. Select only those equipment lines that have the options and specifications that are required.
b. Whenever possible try to standardize newer equipment with models that are presently in operation.
c. Select only reputable distributors that provide quality and timely maintenance service.
5. Receiving new equipment:
a. Unpack equipment and check for any damage in shipping.
b. Check shipping list to verify that all components have been received.
c. Check the machine, making sure that it is the correct model.
d. Check the warranty and service contract for the active date and the termination date.
e. Read the operator’s manual and then test all equipment operations.
Adapted from: T.E. McCormack. “Media Equipment Selection Methods for Law Libraries.” Law Library Journal, 83:299, 1991.
Basic criteria for selecting equipment
- Purpose
- Cost
- Extent of usage
- Skill of patron
- Life expectancy
- Standardization
- Maintenance
- New developments
From: James Cabecceiras, The Multimedia Library. 3rd ed. San Diego: Academic Press, 1991, pp. 82-6.
Steps in preparing a purchase proposal
1. Examine background to the purchase
a. need
b. users
c. location
d. policy on use
e. purchasing policy
f. budget
2. Develop the selection criteria or requirements
a. mandatory
b. desirable
3. Obtain information
4. Evaluate equipment against criteria
5. Write and submit proposal
From: Carol Javes, Managing Multimedia Equipment. 2nd ed. Canberra: DocMatrix, 2002, Chapter 8: Purchase Proposals, pp. 84-94.
Wednesday, July 1, 2009
Non-print equipment & services: Checklist of major purchase considerations
1. Safety
Is the equipment safe under our particular conditions of use?
2. Performance
A. Picture quality
B. Sound quality
3. Cost
Can we afford it? Is it the best for the price?
4. Compatibility and interconnection characteristics
Will it interface with our present and future equipment?
5. Physical Parameters
Will it fit our space, mounting, and/or portability requirements?
6. Durability of construction
7. Ease of operation
How easy is it for our operators to tune or adjust?
8. Tamerproofing or security
Does it have the protection against tampering that we need?
9. Maintenance
Will it be easy for us to service?
10. Warranty or guarantee
Who guarantees what, in what way, for how long?
11. Use Experience
What do previous purchasers think of this equipment: has it been field tested?
12. Availability
Subscribe to:
Posts (Atom)