Many kinds of material—from onionskin to cardboard, wood, and cloth—can be laminated. The rougher the surface, the better the lamination. Those materials that do not laminate well permanently are:
• High-enamel papers such as those used in many magazines
• Other papers with a slick finish
• Smooth metallic, plastic, chalk-covered, or crayon surfaces
• Some photographic paper (it may scorch or melt)
• Moist materials (they cause bubbles on the laminated surface)
Laminating machine features are as follows:
1. Machines come in various widths, from 9 inches to 60 inches wide; the average is 12 inches.
2. Most machines will laminate only light materials, while others will accept a range of materials from a few thousandths of an inch to an eighth of an inch thick.
3. Machines come with one speed or with variable speed. The variable speed adjustment allows heavy materials to be fed in more slowly than light ones.
4. Know your machines. Label the various parts and their functions on the machine itself.
Operating tips.
1. Give yourself plenty of time when laminating.
2. Use the OFF button in case of problems. Do not panic. Many laminating problems can be solved with patience and careful handling.
3. Have available an Exacto knife and fine-grained copper wall pad in case of problems.
4. To prevent jamming of film, when first feeding the material, be prepared to grasp immediately and firmly take hold of the laminated product as it exits the machine. This is very important.
Problems
| Problem | Cause | Solution |
| PROBLEM Product problems | ||
| 1. Blisters, bubbles, or one large area that has not adhered properly. | Machine too cool. | Let machine warm longer. Remove film from material if possible. Relaminate. |
| Dry laminating rollers. | Clean with rubber eraser, or lightly rub with fine-grained copper wool pad. Relaminate. | |
| Excessive moisture in material. | Reduce moisture before laminating: place in warmed dry-mount press at 225 degrees for 30 seconds. After laminating: prick bubbles with pin; then seal film with tacking iron or, for large areas, place in dry-mount press. | |
| Material slick, or powdery surface (chalk or pastels). | Will never laminate well. |

| Problem | Cause | Solution |
| Wrinkles | Wrinkles cannot be eliminated. | |
| Need machine adjustment for wrong tension, too much heat, nonfunctioning cooling fan, or wrong pressure for laminating and pull rollers. | Remove film from your material. Make machine adjustments where possible, or take in for repair. Make adjustments only if the knob or switch is easily accessible. Do not touch the inside of the machine. Relaminate. | |
| Dirty laminating rollers. | Clean with rubber eraser, or rub lightly with fine-grained copper wool. | |
| Tried to reposition material after it was fed into machine. | Material cannot be repositioned once it has been engaged by laminating rollers. | |
| Forced material into machine. | Feed only at motor take-up speed. | |
| Wrinkles appear at glued areas when lightweight glued to heavyweight material. | Glue only at leading edge. | |
| Poor seal at edges. | Adjust machine for temperature too cool, speed too fast, or laminating roller pressure on variable speed models. | Make necessary adjustments where possible, or take in for repair. Make adjustments only if the knob or switch is easily accessible. Do not touch the inside of the machine. Then, relaminate, or use tacking iron to seal edges, put in dry-mount press at 270 degrees to 250 degrees. |
| Material wider than your laminating film. | Trim material and relaminate, or use wider laminator with wider film, or see problem below. |

| Problem | Cause | Solution |
| Laminating oversized materials. | Material too large for width of machine. | Method 1: You may laminate material twice the size of the machine. Fold material in half. Place it on feed table close to edge of film. Laminate. Trim three sides. Do not trim folded side. Refold your material inside out and repeat as above. When you open the finished product, tack down any loose film on fold line using tacking iron. |
| Method 2: (see figure) Cut the material into major pieces. Laminate each piece separately. Align laminated parts to restore original figure. Patch parts together with clear tape, or cut pieces of laminating film to patch parts together. Use tacking iron or clothes iron set on Delicate to laminate patches into place. |

| Problem | Cause | Solution |
| Two separate items accidently overlap and are laminated together. | Materials were too close to each other when fed into machine. | Use Exacto knife to cut through film overlap front and back. Separate materials gently. Relaminate individually, leaving at least a half-inch of clear film between items. |
| Curling of finished lamination. | No heavy weight placed on finished lamination. | After using solutions to problems following, place laminated material under heavy weight until cool. |
| Unbalanced tension in pull rollers or supply rollers. | Make necessary machine adjustments where possible or take in for repair. Make adjustments only if the knob or switch is easily accessible. Do not touch the inside of the machine. | |
| Uneven heat. | Make necessary machine adjustments. Make adjustments only if the knob or switch is easily accessible. Do not touch the inside of the machine. Then relaminate upside down. | |
| Where available, heating shoes not clean. | Clean the material gently with fine-grained copper wool pad. Relaminate. | |
| Excessive moisture in material. | Place the material in warmed dry-mount press at 225 degrees for 30 seconds. Then remove and place heavy book on top. Relaminate. | |
| Machine problems. 7. No power. | Machine not plugged in. Blown fuse in machine. | Plug machine into AC outlet. Check power in wall outlet. Replace machine fuse. Fuse is usually found on back of machine or where rollers are located. |
| 8. Laminating film jams in machine (most common problem) | Failure to grasp film when it first emerges from machine. | Unjam roller. Press OFF. Don’t panic. Work slowly and patiently. Determine whether laminating rollers or pull rollers are jammed with film. On front of machine, cut away film into machine from both top and bottom supply rollers. Remove jammed film as follows: First try: With machine OFF, grasp loose ends of film at roller end and pull with force! Second try: With machine on RUN, grasp loose ends of film, removing as much film as possible while the rollers turn. Last resort: Cut/run/preheat technique: 1. Using Exacto knife, carefully cut into film from laminating roller, without touching roller. 2. Detach film from roller. 3. If possible, holding film with one hand at exit, briefly press RUN, remove as much film as you can, then press PREHEAT to stop machine. 4. Repeat procedures 1 through 3 as many times as necessary. 5. Before reusing machine, extract all jammed film and press PREHEAT to warm machine. |
| 9. Gummy substance accumulates on laminating rollers. | Poor alignment of top and bottom laminating film. Heat melts adhesive of overlapping film onto rollers. | Remove gummy polyethylene from roller with rubber eraser, or lightly rub with fine copper wool pad. Align top and bottom film of supply rolls parallel to each other and matching end to end. |

In-depth
1. Major parts of the laminator
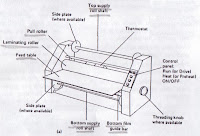
A. A laminator has a feed table and two sets of each of the following parts—one set for top and one set for bottom lamination.
B. Supply rolls—contain new laminating film.
C. Guide bars—keep the film flowing properly from the supply rolls to the laminating rollers.
D. Laminating rollers—provide the laminating process.
E. Pull rollers—pull the laminated product away from the laminating rollers in order for product to exit the machine.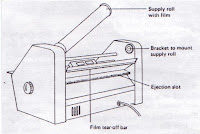
2. Operating laminator
A. Before laminating your material:
1. Check that the material is smaller than the laminator, to allow for proper seal around the edges.
2. If the material is damp, or if it is a damp day, dry the material before laminating. Wrap the material in an envelope of brown wrapping paper, art paper, or blank newsprint. Insert in a dry-mount press at 225 degrees for 30 seconds. Instead of a press, you may substitute a variable speed laminator set at slowest speed.
3. Always run a sample of your type of material. If you change material, run another test. If it does not feed easily, it is too thick.
B. Setting up the laminator
1. Connect the power cord.
2. Press Preheat or Heat to warm the unit.
3. Depending on the machine, the light will either come on or go out when the machine is ready.
C. Feeding material in the laminator.
1. Press Run or Drive to start the laminating rollers.
2. To prevent jamming, when first feeding material, feed with one hand and hold the other hand at the exit to grasp the material as it comes out. When it exits the laminator, it will be completely sealed.
3. Feed material continuously at the laminator speed. Do not push. Leave a half-inch between what was just inserted and the next material to be laminated.
4. If necessary, smooth out the surface of the material, working from the center toward the edges closes to you.
5. When the material is engaged by the rollers, you cannot reposition the material on the feeding table. Wrinkles will occur if any changes are made.
6. Do not stop the machine while the material is engaged by the laminating rollers; otherwise, a pressure mark on the finished product will occur at the stopping point.
D. For temporary stop:
1. Before stopping, make sure that the material is out of the machine and past the tear-off bar.
2. While still on Run, insert a thin cardboard until it is halfway between the entrance and exit slots.
3. Press Preheat, Heat, or Stop, whichever is applicable, to stop the machine.
4. Do not let the machine stand for thirty minutes without using it. Switch it off.
5. On some units, wait two minutes to press Run or Drive is the machine is turned off and back on quickly.
E. After laminating has been completed:
1. Press off.
2. Cut off the material, leaving a few inches of film past the exit slot.
3. Trim the edges of the product with scissors or paper cutter, leaving an eighth-inch margin of laminated film all around for total seal.
3. Using new film
A. Ordering film—four factors are important:
1. T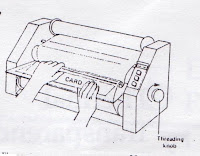 hickness of film (average is 0.0015 millimeters)
3. Width of film (should be smaller than shaft width)
4. Diameter of film core (sizes are 1 inch and 2 ¼ inches; average is 1 inch)
5. Manner in which the film is wound on the roll (determine whether the shiny or dull side of the film shows on top of the old roll before discarding it).
B. Knowing when film is running out:
To alert you, a paper label appears on film within 2 feet of the end of the supply roll. Either use the film until the end, or cut and replace the old rolls at that point. Save end-of-film remnants. They can be used for patching together oversized materials that must be laminated in sections.
C. Loading film:
NOTE: Both supply rolls of film should be changed at the same time, even if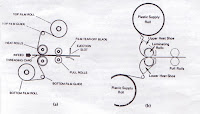 only one roll is empty.
1. To remove old supply rolls, turn the machine to PREHEAT or HEAT.
Remove the feed table from the laminator.
Remove the empty supply rolls from the machine. If one roll still has film feeding into the machine, use scissors or an Exacto knife to cut the remaining film from the supply roll. Remove the roll.
If there is film already on the laminating rolls, allow it to run through the machine.
Hold onto the film as it exits the machine. Press RUN.
Press OFF when all of the film is out of the machine.
Where applicable, remove the metal side plates on both supply rolls.
Remove the shaft from both supply roll cores.
2. When inserting new supply rolls and threading, the laminator should be OFF.
Supply rolls: Lay the new supply rolls out in front of the machine. Unwind some film from each. Note that once the supply rolls are on the machine, the dull sides of the film must meet where the laminating rolls meet. If you are not sure which is the dull adhesive side, place the roll on a table. The film will curl toward the adhesive side.
Shafts: Check the way the shafts fit into the machine. They will only go in one way.
Insert a shaft into each new supply roll.
Where applicable, replace the metal side plates after the supply rolls are on the shafts. If the plates fit too loosely, they may be inside out. Replace a plate on the thin end of the shaft first.
Replace each shaft with a roll on the machine.
Check that the top and bottom supply rolls are exactly aligned with each other, matching end to end. They must also be aligned with the laminating rollers. Check that the dull sides of the film will meet at the laminating rollers.
Guide bars: Depending on your model, the film should go over or under the guide bars, actually touching the guide bar when ready to feed into the laminating rollers. There is a top guide bar and a bottom guide bar; the bottom guide bar is sometimes hard to locate.
Patience will triumph.
D. Engaging the film in machine before replacing the feed table:
1. Unwind some film from both the top and bottom rollers.
2. Overlap the film so that the edge of the film for the top supply roll extends almost to the bottom supply roll, and vice versa. Carefully overlap and wrap both film layers inside each other a couple of times.
3. Hold the wrapped-up film with your left hand where the laminating rollers meet.
4. With your right hand, insert and push a thin sheet of cardboard against the overlapping rollers. This forces the overlapping films between the rollers.
5. If your laminator has a THREADING KNOB, usually found on the right side of the machine, turn it clockwise until the cardboard is gobbled up by the laminating rollers. This action sometimes requires brute strength. When the film is engaged, let the knob go.
6. Press PREHEAT or HEAT.
7. Press RUN when the machine is ready.
8. Grasp the cardboard quickly as it exits the machine. Press OFF.
NOTE: If the cardboard does not exit, the THREADING KNOB, where available, is not turned enough, or one laminating roller may have the overlapped film wrapped around itself. Cut the film from that roller, pull out more film. Put it where the rollers meet at the front of the machine. Press RUN. When the cardboard exits, be ready to grasp it quickly. Immediately press OFF.
9. Press PREHEAT or HEAT, and allow the machine to warm up.
10. If there are wrinkles on the film of the top laminating roller, center the top supply roll on the machine.
11. Press RUN or DRIVE to test that the film is laminating properly and that it is wrinkle-free.
12. Cut the film-encased cardboard, leaving a few inches of film at the exit point.
13. Install the feed table.
14. The machine is now ready to laminate your material.
IV. Cleaning the machine.
Clean while the machine is warm but unplugged (see Figure.)
A. Laminating and pull rollers:
1. For light deposit of gummy polyethylene substance, use an ordinary rubber eraser, or use a special polyethylene remove available from your dealer. Wipe on with a soft rag.
2. For heavy deposits, gently rub a fine-grained copper wool pad on the rollers until the polyethylene balls up and can be picked off by hand.
B. Heating shoes with nonstick surface (used in Laminex and Index machines):
1. Use a special polyethylene liquidremover available from your dealer. Wipe on with a soft rag.
2. Try fine-grained steel wool pad number 00 or finer. Rub very lightly; then blow away particles with compressed air (available at a camera dealer).
1. Major parts of the laminator
A. A laminator has a feed table and two sets of each of the following parts—one set for top and one set for bottom lamination.
B. Supply rolls—contain new laminating film.
C. Guide bars—keep the film flowing properly from the supply rolls to the laminating rollers.
D. Laminating rollers—provide the laminating process.
E. Pull rollers—pull the laminated product away from the laminating rollers in order for product to exit the machine.


2. Operating laminator
A. Before laminating your material:
1. Check that the material is smaller than the laminator, to allow for proper seal around the edges.
2. If the material is damp, or if it is a damp day, dry the material before laminating. Wrap the material in an envelope of brown wrapping paper, art paper, or blank newsprint. Insert in a dry-mount press at 225 degrees for 30 seconds. Instead of a press, you may substitute a variable speed laminator set at slowest speed.
3. Always run a sample of your type of material. If you change material, run another test. If it does not feed easily, it is too thick.
B. Setting up the laminator
1. Connect the power cord.
2. Press Preheat or Heat to warm the unit.
3. Depending on the machine, the light will either come on or go out when the machine is ready.
C. Feeding material in the laminator.
1. Press Run or Drive to start the laminating rollers.
2. To prevent jamming, when first feeding material, feed with one hand and hold the other hand at the exit to grasp the material as it comes out. When it exits the laminator, it will be completely sealed.
3. Feed material continuously at the laminator speed. Do not push. Leave a half-inch between what was just inserted and the next material to be laminated.
4. If necessary, smooth out the surface of the material, working from the center toward the edges closes to you.
5. When the material is engaged by the rollers, you cannot reposition the material on the feeding table. Wrinkles will occur if any changes are made.
6. Do not stop the machine while the material is engaged by the laminating rollers; otherwise, a pressure mark on the finished product will occur at the stopping point.
D. For temporary stop:
1. Before stopping, make sure that the material is out of the machine and past the tear-off bar.
2. While still on Run, insert a thin cardboard until it is halfway between the entrance and exit slots.
3. Press Preheat, Heat, or Stop, whichever is applicable, to stop the machine.
4. Do not let the machine stand for thirty minutes without using it. Switch it off.
5. On some units, wait two minutes to press Run or Drive is the machine is turned off and back on quickly.
E. After laminating has been completed:
1. Press off.
2. Cut off the material, leaving a few inches of film past the exit slot.
3. Trim the edges of the product with scissors or paper cutter, leaving an eighth-inch margin of laminated film all around for total seal.
3. Using new film
A. Ordering film—four factors are important:
1. T
 hickness of film (average is 0.0015 millimeters)
3. Width of film (should be smaller than shaft width)
4. Diameter of film core (sizes are 1 inch and 2 ¼ inches; average is 1 inch)
5. Manner in which the film is wound on the roll (determine whether the shiny or dull side of the film shows on top of the old roll before discarding it).
B. Knowing when film is running out:
To alert you, a paper label appears on film within 2 feet of the end of the supply roll. Either use the film until the end, or cut and replace the old rolls at that point. Save end-of-film remnants. They can be used for patching together oversized materials that must be laminated in sections.
C. Loading film:
NOTE: Both supply rolls of film should be changed at the same time, even if
 only one roll is empty.
1. To remove old supply rolls, turn the machine to PREHEAT or HEAT.
Remove the feed table from the laminator.
Remove the empty supply rolls from the machine. If one roll still has film feeding into the machine, use scissors or an Exacto knife to cut the remaining film from the supply roll. Remove the roll.
If there is film already on the laminating rolls, allow it to run through the machine.
Hold onto the film as it exits the machine. Press RUN.
Press OFF when all of the film is out of the machine.
Where applicable, remove the metal side plates on both supply rolls.
Remove the shaft from both supply roll cores.
2. When inserting new supply rolls and threading, the laminator should be OFF.
Supply rolls: Lay the new supply rolls out in front of the machine. Unwind some film from each. Note that once the supply rolls are on the machine, the dull sides of the film must meet where the laminating rolls meet. If you are not sure which is the dull adhesive side, place the roll on a table. The film will curl toward the adhesive side.
Shafts: Check the way the shafts fit into the machine. They will only go in one way.
Insert a shaft into each new supply roll.

Where applicable, replace the metal side plates after the supply rolls are on the shafts. If the plates fit too loosely, they may be inside out. Replace a plate on the thin end of the shaft first.
Replace each shaft with a roll on the machine.
Check that the top and bottom supply rolls are exactly aligned with each other, matching end to end. They must also be aligned with the laminating rollers. Check that the dull sides of the film will meet at the laminating rollers.
Guide bars: Depending on your model, the film should go over or under the guide bars, actually touching the guide bar when ready to feed into the laminating rollers. There is a top guide bar and a bottom guide bar; the bottom guide bar is sometimes hard to locate.
Patience will triumph.
D. Engaging the film in machine before replacing the feed table:
1. Unwind some film from both the top and bottom rollers.
2. Overlap the f
ilm so that the edge of the film for the top supply roll extends almost to the bottom supply roll, and vice versa. Carefully overlap and wrap both film layers inside each other a couple of times.3. Hold the wrapped-up film with your left hand where the laminating rollers meet.
4. With your right hand, insert and push a thin sheet of cardboard against the overlapping rollers. This forces the overlapping films between the rollers.
5. If your laminator has a THREADING KNOB, usually found on the right side of the machine, turn it clockwise until the cardboard is gobbled up by the laminating rollers. This action sometimes requires brute strength. When the film is engaged, let the knob go.
6. Press PREHEAT or HEAT.
7. Press RUN when the machine is ready.
8. Grasp the cardboard quickly as it exits the machine. Press OFF.
NOTE: If the cardboard does not exit, the THREADING KNOB, where available, is not turned enough, or one laminating roller may have the overlapped film wrapped around itself. Cut the film from that roller, pull out more film. Put it where the rollers meet at the front of the machine. Press RUN. When the cardboard exits, be ready to grasp it quickly. Immediately press OFF.
9. Press PREHEAT or HEAT, and allow the machine to warm up.
10. If there are wrinkles on the film of the top laminating roller, center the top supply roll on the machine.
11. Press RUN or DRIVE to test that the film is laminating properly and that it is wrinkle-free.
12. Cut the film-encased cardboard, leaving a few inches of film at the exit point.
13. Install the feed table.
14. The machine is now ready to laminate your material.
IV. Cleaning the machine.
Clean while the machine is warm but unplugged (see Figure.)

A. Laminating and pull rollers:
1. For light deposit of gummy polyethylene substance, use an ordinary rubber eraser, or use a special polyethylene remove available from your dealer. Wipe on with a soft rag.
2. For heavy deposits, gently rub a fine-grained copper wool pad on the rollers until the polyethylene balls up and can be picked off by hand.
B. Heating shoes with nonstick surface (used in Laminex and Index machines):
1. Use a special polyethylene liquid
remover available from your dealer. Wipe on with a soft rag.2. Try fine-grained steel wool pad number 00 or finer. Rub very lightly; then blow away particles with compressed air (available at a camera dealer).
Glossary
Core Hard cardboard roll around which laminating film is wrapped.
Heating shoes See Shoes.
Nip Slit or space between the top and bottom laminating rollers where material is fed for lamination.
Off Control used when lamination is finished.
Preheat or Heat Control used to warm up the machine.
Roller, rolls See InDepth 1, Major parts of the laminator.
Run or Drive Laminating controls. When Run is pressed, the film will feed into the machine. Lamination can begin if the machine has reached proper temperature.
Shaft Metal rod inside each supply roll that suspends the supply rolls on the machine.
Shoes Panels that provide the heat for lamination on some machines.
Side plates Circular metal plates on some machines that hold the shaft and supply rolls securely to each other.
Tacking iron A small, hand-held accessory usually used in conjunction with the dry-mount press. When warm and applied to a heat-sensitive adhesive surface, it tacks or bonds this surface to another.
Threading knob Found on some machines, used to carry sample cardboard through the machine before starting regular lamination with new rolls of film.
No comments:
Post a Comment